Decentralised technologies interest me greatly. A sub-section of this genre is decentralised storage, which got its first mass debut with Napster. Napster was a “hybrid” model in that it used servers to coordinate peers… but not long after Napster other peer-2-peer services came along, like Kazaa, Kademlia (the basis for a myriad of p2p services), BitTorrent and very recently the boldly named InterPlantaryFileSystem RAWR. None of these protocols support monetisation. They are embodiments of the sharing economy.
More recently, companies have tried to produce decentralised storage systems which do monetise data storage. The big recent names have been Sia, Ubbey and Storj, with perhaps Urbit hanging around in the background. All of these fledgling systems have had major issues associated with them, which is an interesting discussion in itself. I’ve experimented with at least Sia and Ubbey previously.
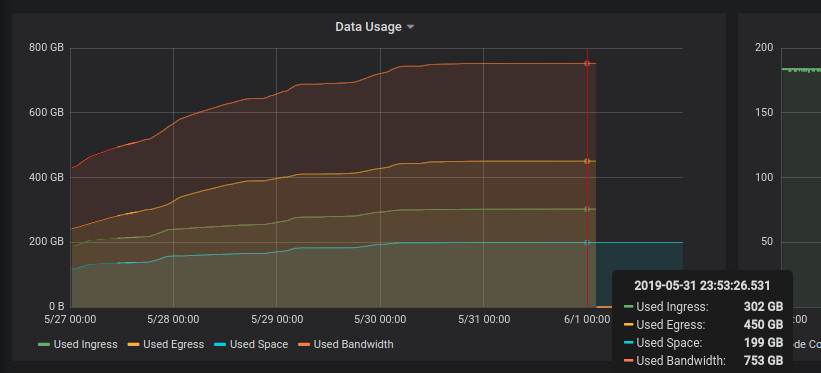
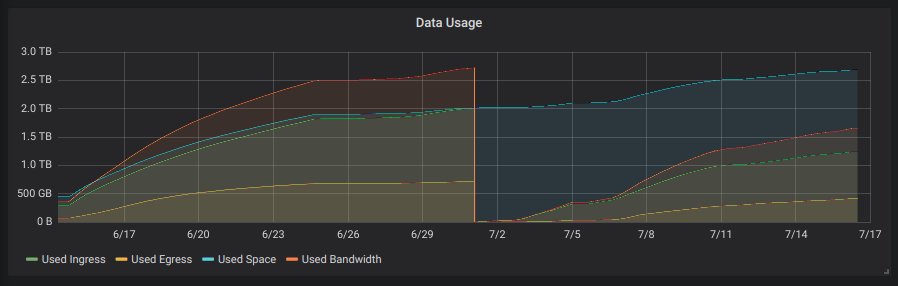
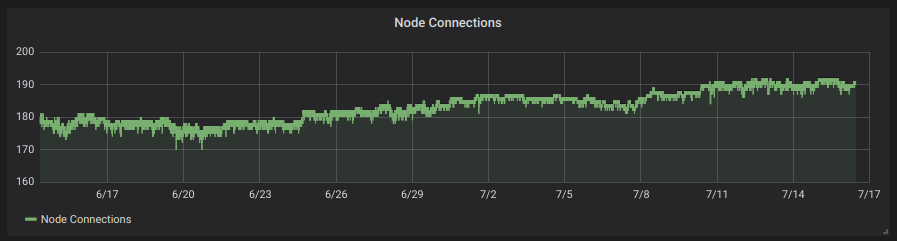
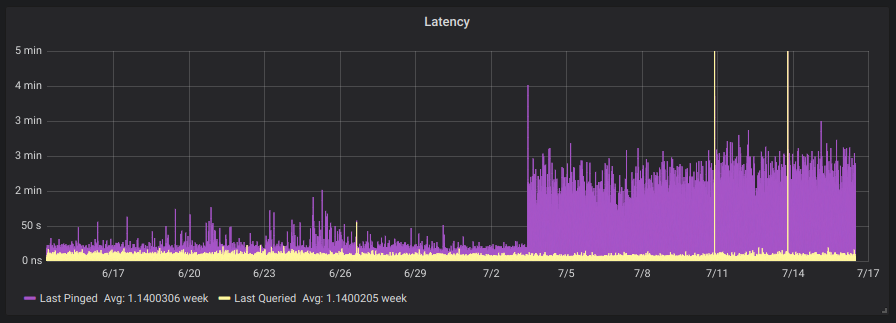
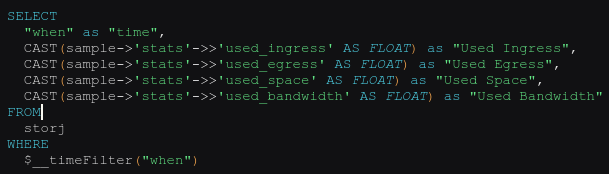
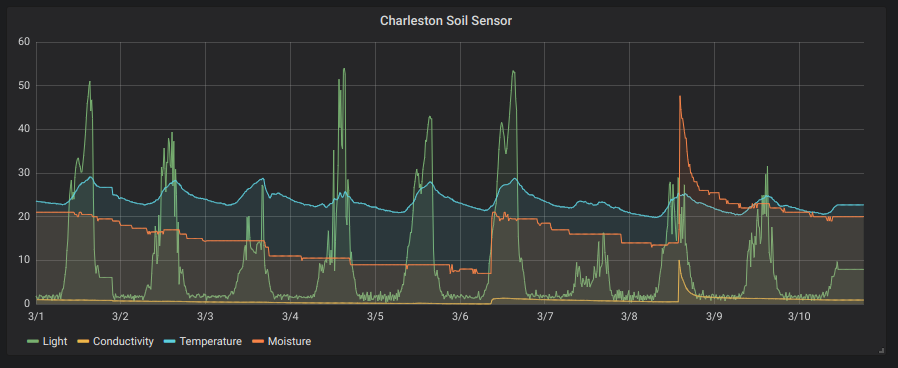
Storj recently announced that they were going to completely overhaul their network based on lessons learnt from their current system (v2) and asked for testers for their new system. I signed up and so far their software has been stable. I’ve written a small app which grabs telemetry from their daemon and inserts it into a Postgres database. Grafana is then used to graph this data.
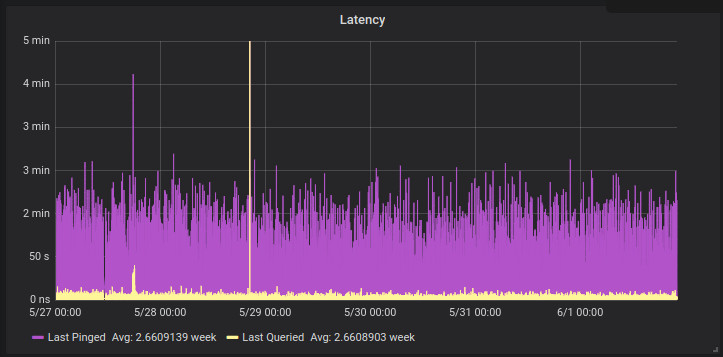
StorageNode data utilisation graphStorj Storage Node egress, ingress and storage utilisation over the course of a month.Node connections… is this the entire network ?Storj Storage Node “Latency”Bandwidth Usage
To get a small logging system going you’ll need to do this :
Launch a Postgres instance on your Docker-enabled machine :
docker run --restart=always -d -p 3000:3000 --name=grafana -v /home/yourhome/grafana-data:/var/lib/grafana --link storj-pg:storj-pg grafana/grafana
# You can also use a network to link these machines, which is the new way of doing things and is a fair bit sexier than the "link" directive.
and then launch my app (to generate the initial config) :
docker run -ti --rm --detach=false -v /home/yourhome/telemetryconfig:/config aquarat/storj-postgres-logger:0.3a app -configfile=/config/config.json
My app will create a config file in the host directory, which you will need to modify to suit your installation. Once that’s done, relaunch it to check it works :
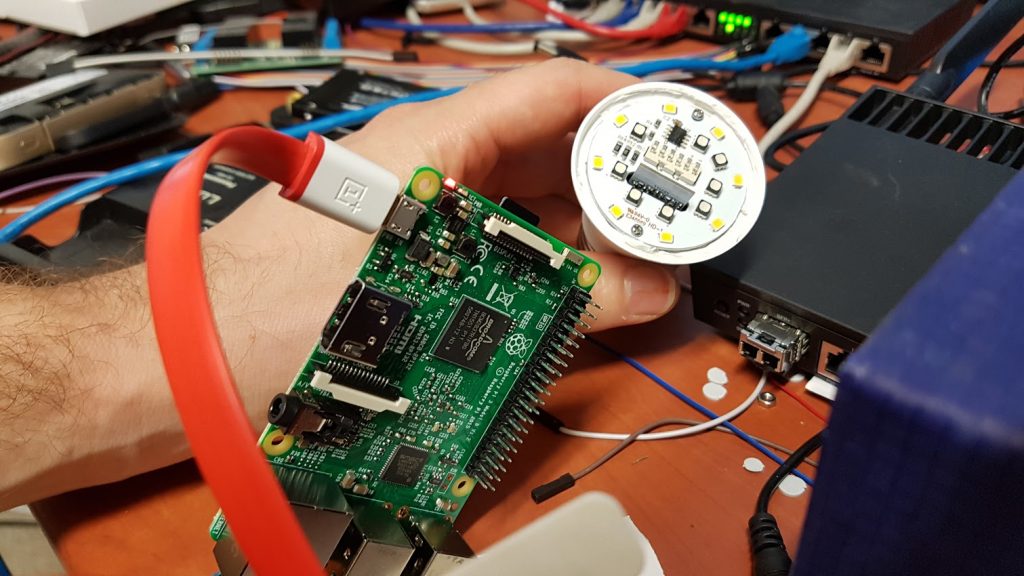
Sonoff smart devices tout various features, all accessible through the “EWELink” app and “cloud” infrastructure (it looks super crap). Um, no, if it’s in my house and on my WiFi network it needs to run open source software (or at least be made by a trustworthy company subject to mass scrutiny – even that’s not ideal, but life’s full of trade-offs). Sonoff devices are of particular interest to me because they (1) run a well-known micro-controller that has a lot of community-driven software and support available, (2) they’re SUPER cheap [$1.50] and (3) they’re really versatile. I’m proud to say that although I own and operate more than 20x Sonoff smart devices I’ve never installed their Android app. Life’s too short for that.
I bought one Sonoff B1 R2 to test with… it was a ball-ache to programme it with custom firmware (Tasmota) but it was possible and it works well once flashed.
Flashing a Sonoff B1 R2 is far from great. I just want lights and colours, not soldering.
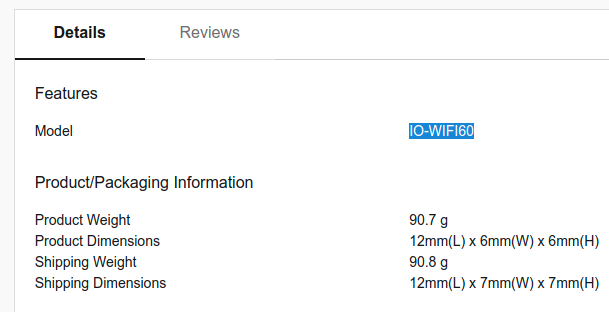
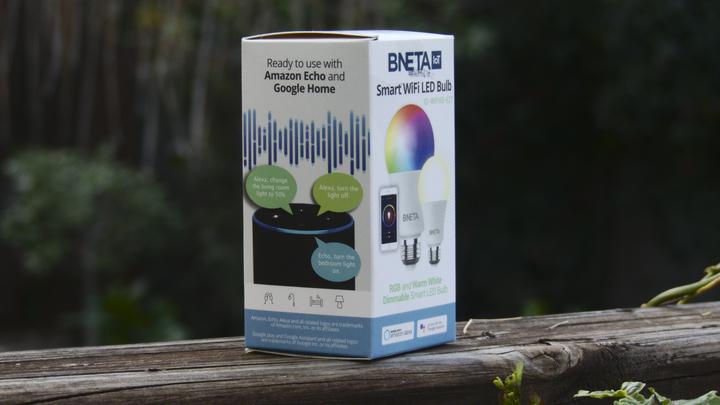
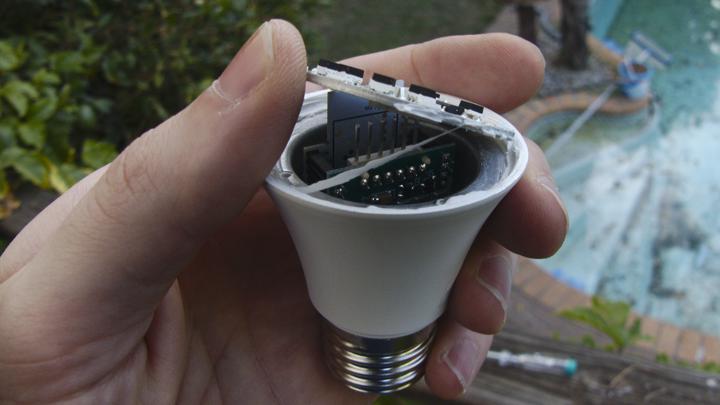
I recently came across an advert for a WiFi “Smart” LED light at a local mass retailer (ultimately owned by Walmart, known as Makro in South Africa). The LED light was branded by a local company but South African companies rarely produce anything original (sorry guys, we don’t, we should, I really wish we did). The light was on special too and a fair bit cheaper than the Sonoff. This was too tempting. I thought “what are the chances it’s just a rebranded Sonoff device ?”. The device has the same basic specs and power rating as the Sonoff B1. Googling for the device name only yielded the local company’s empty website, but searching for the product’s SKU “IO-WIFI60” revealed a link to a Chinese site.
Makro’s SKU
So yes, screw it, let’s give it a go. R 250 (about $19) later and we have this :
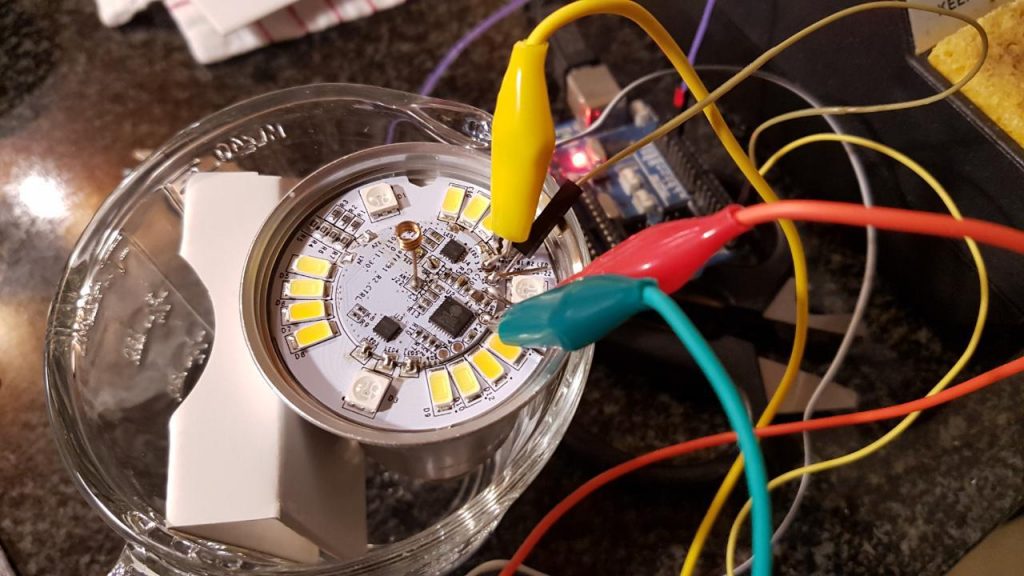
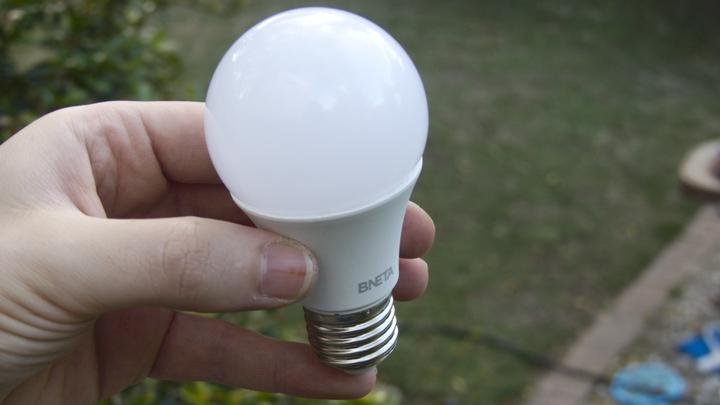
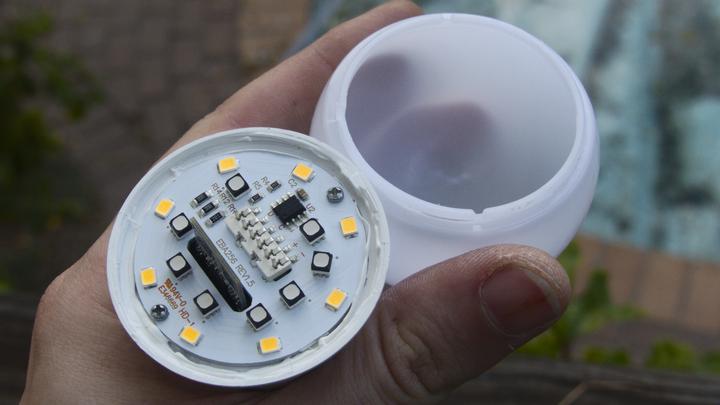
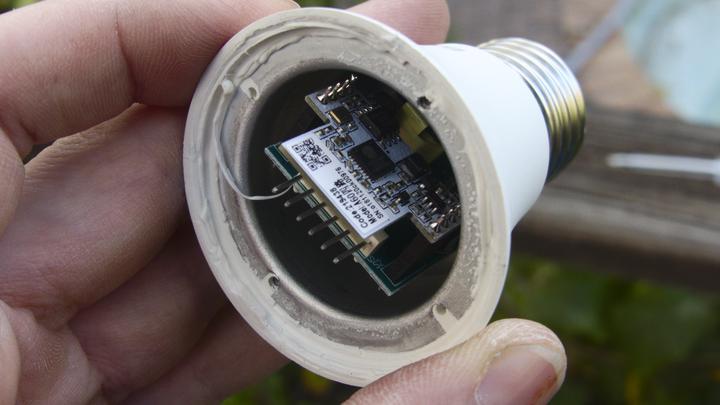
Yeah, I opened it up on the drive home 😀 Unlike the Sonoff, which either pops off or unscrews this light top has been glued on. The line on my thumb is from voting 😉I’m very excited at this point because that looks like an ESP8266 dev board WOOOOOHOOOOOScrews gone. The white stuff on top feels like silicone, but below it there’s thermal paste. I assume to bond the mostly copper top PCB to the alloy base. You can see a bit of the thermal paste going on there and what looks like a power supply PCB with the dev board riding on top of it. It’s essentially a DIP8 package. The board can’t be easily separated from the power supply PCB and the PSU PCB appears to be soldered to the base.And there’s the ESP8266 😄😄😄 along with what looks like a voltage regulator, clock source, etc. The bit sticking out is the PCB antenna. Once again, below the white board is a power supply PCB which runs down into the E27 fitting. At this point I didn’t know what the label/QR code/code meant.Label removed and ahhhh, a model number.
A quick Google search and…
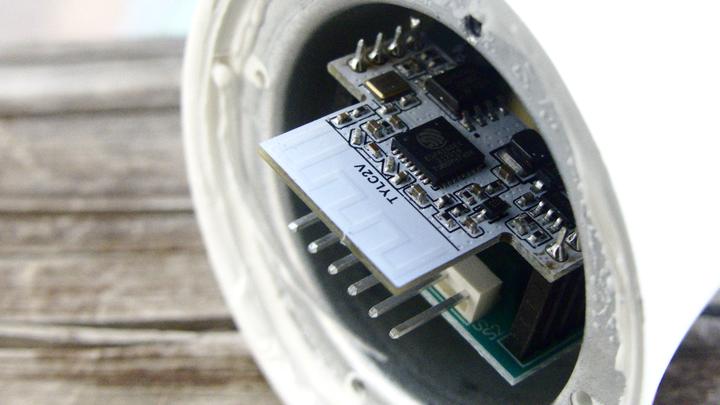
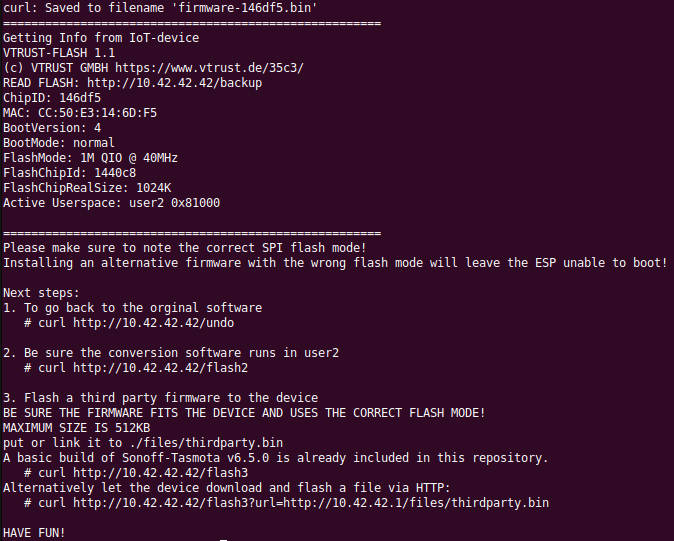
The module the MCU is on, as it turns out, is made by a company called Tuya. The label with a QR code on it that I removed is a key for Tuya’s cloud infrastructure. In short Tuya makes ready-to-go ESP8266 modules that are pre-flashed to work with their cloud infrastructure. The idea being that you point your users to a white label app branded with your logos, which configures the device via WiFi. As the manufacturing company (pffft) you buy several thousand pre-flashed/configured WiFi modules from Tuya and integrate them into your product. This is interesting but still problematic as I don’t want their firmware in my house haha. There are no easily-accessible pins to flash this device… maybe someone has hacked the OTA protocol.
I can feel the excitement GROWING. Bring me the Pi!
Yes, that Pi will do. Hands ftw.
unzip 2019-04-08-raspbian-stretch-lite.zip
dd if=2019-04-08-raspbian-stretch-lite.img bs=64k of=/dev/sde status=progress
mount /dev/sde1 /mnt/sde
touch /mnt/sde/ssh
sync
umount /mnt/sde
<some time later>
# GO GO GO!
ssh [email protected]
sudo mount -o remount,async,commit=500,discard,noatime,nodiratime /
# ^ It's called living dangerously :D Speeeeeeeeeed
sudo apt update
sudo apt install byobu git
byobu
git clone https://github.com/ct-Open-Source/tuya-convert
cd tuya-convert
./install_prereq.sh
# You're not going fast enough :<
./start_flash.sh
Go go go!
pi@raspberrypi:~/tuya-convert$ ./start_flash.sh
~/tuya-convert/scripts ~/tuya-convert
======================================================
TUYA-CONVERT
https://github.com/ct-Open-Source/tuya-convert
TUYA-CONVERT was developed by Michael Steigerwald from the IT security company VTRUST (https://www.vtrust.de/) in collaboration with the techjournalists Merlin Schumacher, Pina Merkert, Andrijan Moecker and Jan Mahn at c't Magazine. (https://www.ct.de/)
======================================================
PLEASE READ THIS CAREFULLY!
======================================================
TUYA-CONVERT creates a fake update server environment for ESP8266/85 based tuya devices. It enables you to backup your devices firmware and upload an alternative one (e.g. ESPEasy, Tasmota, Espurna) without the need to open the device and solder a serial connection (OTA, Over-the-air).
Please make sure that you understand the consequences of flashing an alternative firmware, since you might lose functionality!
Flashing an alternative firmware can cause unexpected device behavior and/or render the device unusable. Be aware that you do use this software at YOUR OWN RISK! Please acknowledge that VTRUST and c't Magazine (or Heise Medien GmbH & Co. KG) CAN NOT be held accountable for ANY DAMAGE or LOSS OF FUNCTIONALITY by typing yes + Enter
yes
======================================================
Starting AP in a screen
Stopping any apache web server
Starting web server in a screen
Starting Mosquitto in a screen
======================================================
IMPORTANT
1. Connect any other device (a smartphone or something) to the WIFI vtrust-flash
The wpa-password is flashmeifyoucan
This step is IMPORTANT otherwise the smartconfig will not work!
2. Put your IoT device in autoconfig/smartconfig/pairing mode (LED will blink fast). This is usually done by pressing and holding the primary button of the device
3. Press ENTER to continue
======================================================
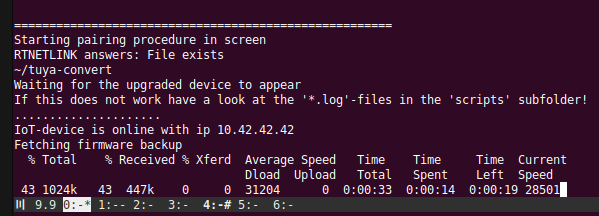
Starting pairing procedure in screen
RTNETLINK answers: File exists
~/tuya-convert
Waiting for the upgraded device to appear
If this does not work have a look at the '*.log'-files in the 'scripts' subfolder!
....................................................................................................................
Okay, so, that didn’t work. Tailing the log files indicates the device is present but rejected connection attempts. Probably a race condition. Let’s try again. Off, On Off On Off On… blinking fast. Here we go.
YesssssssThank you, I WILL HAVE FUN Merlin Schumacher, Pina Merkert, Andrijan Moecker and Jan Mahn. Did I mention they came up with this very slick project ? Thank you!
Target device retrieving the firmware during OTA 😀
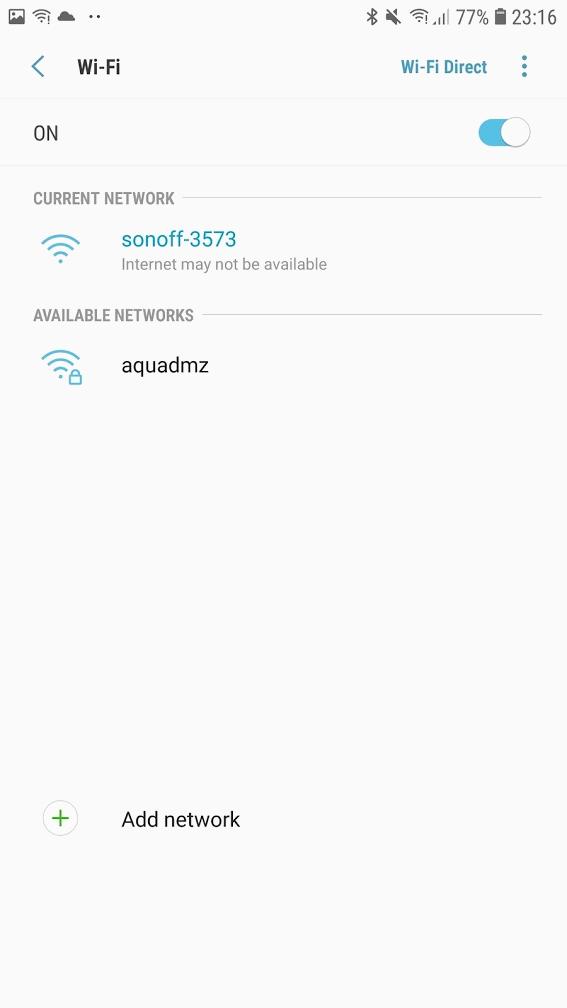
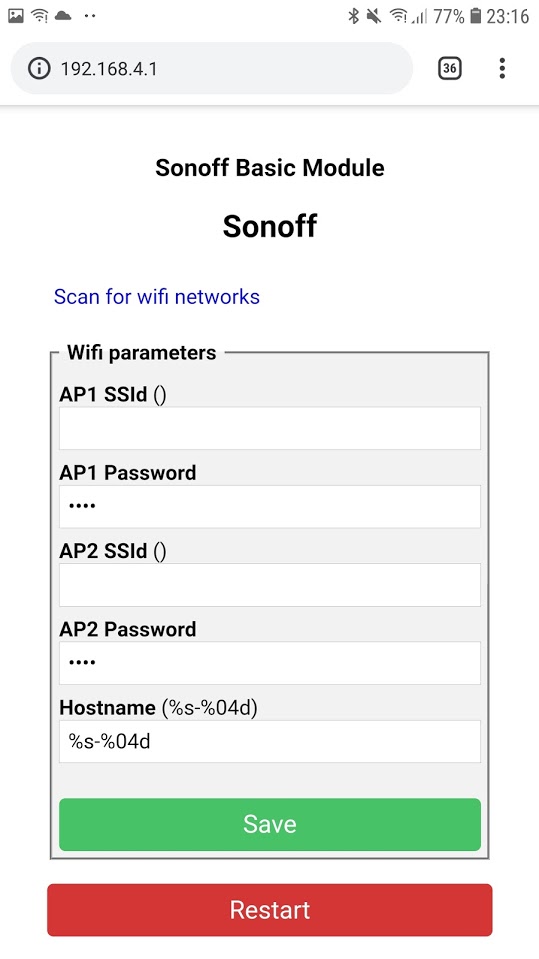
Go to your mobile phone and connect to the Tasmota-created network, then go to your phone’s browser and navigate to 192.168.4.1
Enter your wifi network’s SSID and password and click “Save”. Do this quickly, you have 3 minutes from boot to do it otherwise the device reboots.
Okay, so at this point we have an ESP8266 running the base Tasmota firmware. The Tasmota firmware has different modules which allow it to manage different kinds of devices. There’s a big variety involved though, like dimmers, switches, temperature sensors, etc. So we need to be fairly specific about the kind of device we’re trying to control. I need a Tasmota “template”. I’m hoping something someone else has created will work with this device. Looking at this page one particular candidate stands out : (there’s that “60” again from the Makro SKU…)
The device is on my home network now, so I can configure it using my desktop machine’s browser yay.
Go to the device IP with a browser and click : Configuration -> Configure Other
So this is great, but now I want to get the device to talk to Home Assistant. To do that start by configuring the device name :
Configure -> Other : Set Friendly Name
Set your MQTT config to point to your HA system.
And then my favourite: go to the console and run the following :
Sleep 0
NTPServer 8.8.8.8 #as an example
Timezone 2
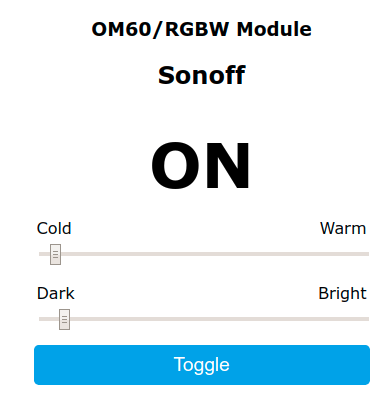
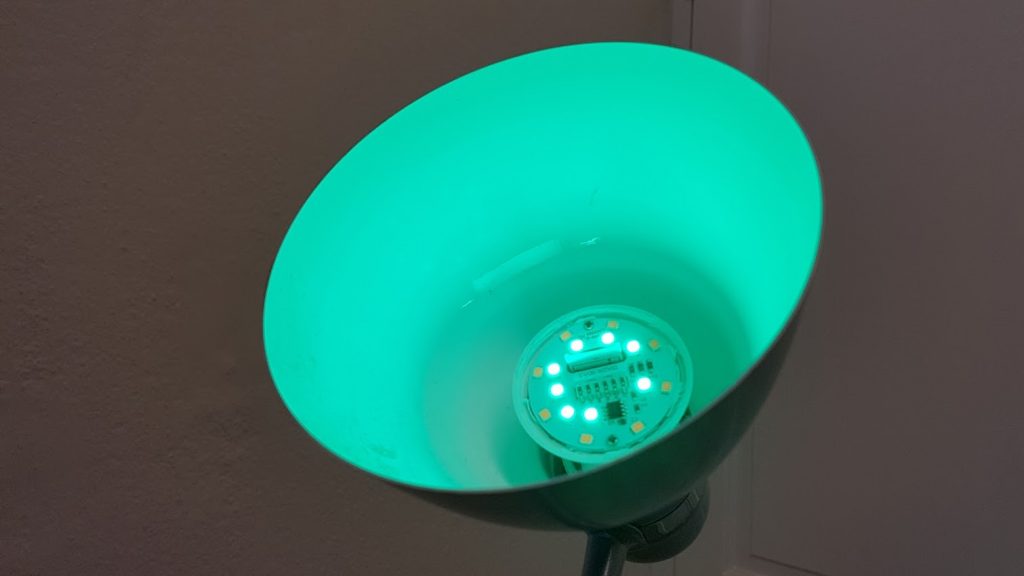
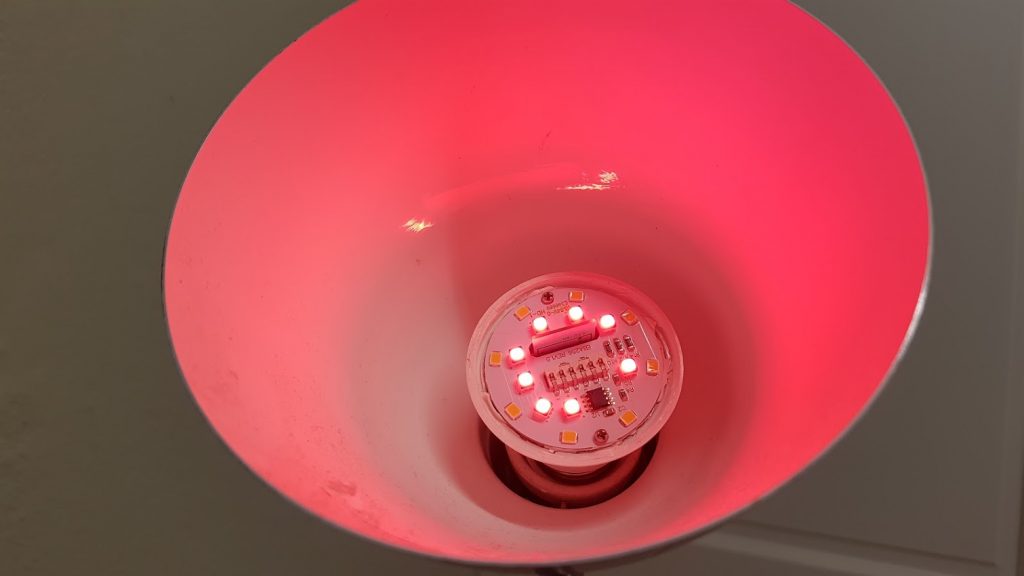
#and then some fun : Set the colour to red :
Color ff00000000
#green
Color 00ff000000
#blue
Color 0000ff0000
#white
Color 000000ff00
# all on - it's damn bright
Color ffffffff00
# These allow HA to auto-detect the device - but you'll need to upgrade from the basic to classic firmware first.
SetOption19 1
SetOption31 1
Of course the real benefit of all this is integration into Home Assistant’s web interface 🙂 Now I can script the lights as part of a larger network of devices… think continuously adjusting house lighting based on presence and current exterior lighting conditions.
Controlling groups of lights.
And that’s about that. Hopefully this helps someone 🙂
What a mouthful that title is. This post is a WIP.
I recently discovered the joys (😉) of running docker containers on armhf and arm64 machines. This is a quick guide, mostly for myself, so I can reproduce the steps to creating dockerhub autobuilding images for multiple architectures.
AKA If you have a project, hosted in a public repository like Github or Bitbucket and your project may be run in a docker container on hosts with different CPU architectures, this is how you can get DockerHub to Autobuild your project.
Start by enabling "experimental" CLI features in your docker client : (add the "experimental" key and value)
Either create a new repository on DockerHub using the web interface or push an existing image to DockerHub (which automatically creates the repository) :
docker push aquarat/volantmq:amd64
In your repository, create the file structure described below and populate them accordingly. The documentation for this structure can be found here.
File structure : (largely lifted from this awesome Github answer)
#!/bin/bash

BUILD_ARCH=$(echo "${DOCKERFILE_PATH}" | cut -d '.' -f 2)

[ "${BUILD_ARCH}" == "Dockerfile" ] &&
    { echo 'qemu-user-static: Registration not required for current arch'; exit 0; }

docker run --rm --privileged multiarch/qemu-user-static:register --reset
Dockerfile -> Your standard amd64 Dockerfile.
An example of the start of this would be VolantMQ’s Dockerfile :
cat Dockerfile.armhf

FROM golang:1.11.1 as builder
LABEL stage=intermediate
and now Dockerfile.armhf, our armhf build :
cat Dockerfile.armhf

FROM golang:1.11.1 as builder
LABEL stage=intermediate

COPY qemu-arm-static /usr/bin/
"qemu-arm-static" is a binary executable that acts as an emulator for armhf executables. It is downloaded by the pre_build script, which is called by DockerHub during the autobuild.
Dockerfile.aarch64:
cat Dockerfile.aarch64
FROM golang:1.11.1 as builder
LABEL stage=intermediate

COPY qemu-aarch64-static /usr/bin/
In order to allow the docker container to use this emulator you’ll need to register it as a binary executable handler (this tells the kernel how to deal with specific files). This should be covered by pre_build, but in case it isn’t: In Ubuntu install qemu-user-static :
qemu-user-static
or execute a docker image :
docker run --rm --privileged vicamo/binfmt-qemu:latest
Once you’ve got this done, you can test your builds locally, like so :
# Create a manifest that describes your DockerHub repository
# This takes the form of the multi-arch "virtual" image and then its constituent images.
docker manifest create aquarat/volantmq:latest aquarat/volantmq:aarch64 aquarat/volantmq:armhf aquarat/volantmq:amd64

# Tag each non-amd64 image apropriately
docker manifest annotate aquarat/volantmq:latest aquarat/volantmq:armhf --os linux --arch arm
docker manifest annotate aquarat/volantmq:latest aquarat/volantmq:aarch64 --os linux --arch arm64 --variant armv8

# and then push your changes to DockerHub
docker manifest push aquarat/volantmq

# and then to inspect the result :
docker run --rm mplatform/mquery aquarat/volantmq
How to host websites and services on a fibre line while enduring regular power failures.
This website was hosted on an Intel NUC, sporting an Intel i7 CPU and a luxurious 32GBs of RAM. Serving websites from your home is viable when you have 100mbit symmetric fibre (You are awesome Vumatel). Unfortunately, South Africa occasionally can’t supply enough power to meet the demand of its public at which point South Africans experience load shedding.
My home was recently load shed for 5 hours a day on several days during the course of a week – and that got me thinking; why am I hosting relatively static content on a machine that uses around 200W of electricity when I could probably cut down on electricity costs by switching to a lower power machine and SSDs ? (I can’t switch everything, but small websites are a good target)
This seemed like the perfect time to try out Debian BUSTER for 64-bit ARM rawr. Running docker on a Pi with 1GB of RAM is probably a ridiculous, but it’s surprisingly usable. Better yet, you can run a Pi from a USB power bank for several hours, and UPS-like switch-over functionality is included as part of the deal (most of the time…) It’s got to be the cheapest way to reliably host anything and it reduces the power bill.
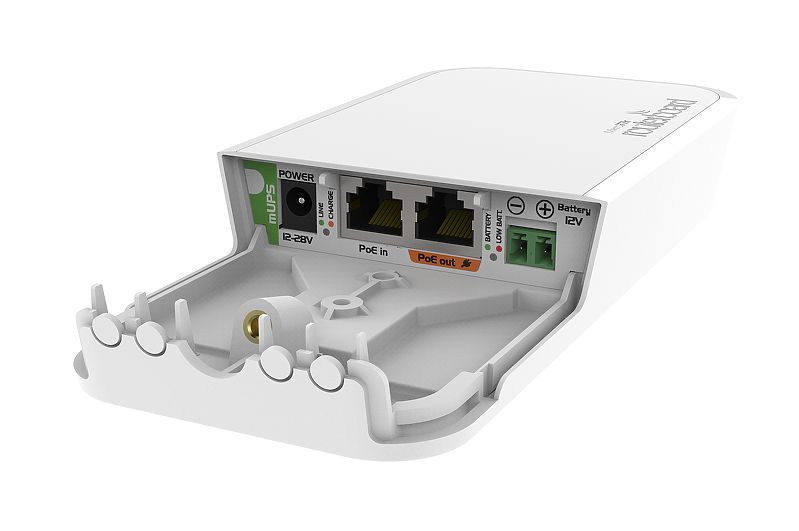
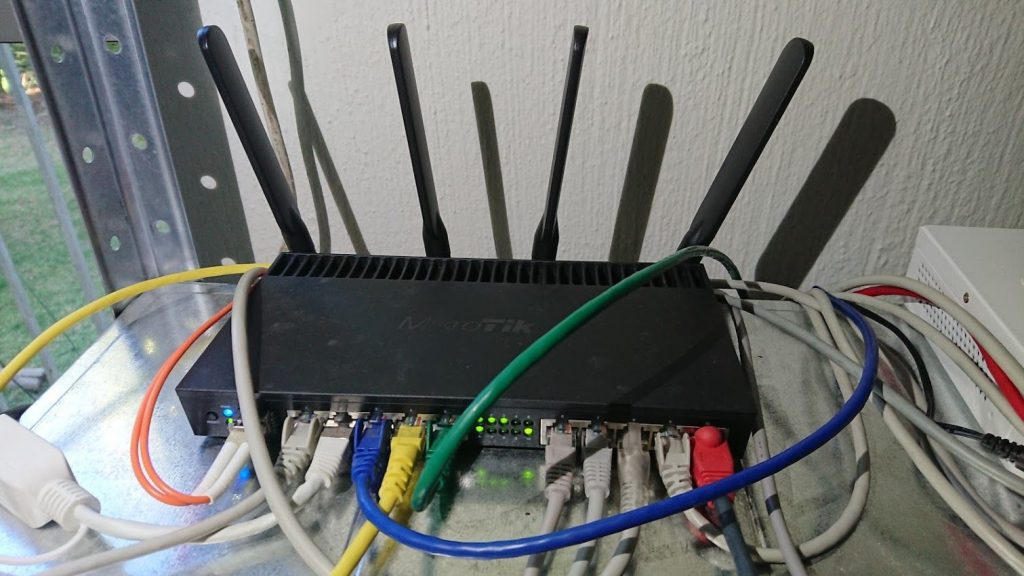
The first step is getting your routers to stay powered during a power failure. Decent routers usually have a Power-over-Ethernet capability and Mikrotik is no exception. Mikrotik makes a relatively inexpensive POE UPS for their routers called the mups. The mups is small, cheap and simply plugs in between the router and the existing POE source. It charges a 12V battery (you choose the size) and seamlessly switches to it in the event of a power failure.
The way a Mikrotik MUPS is supposed to look.
You might ask “Why can’t I use a normal UPS to power my routers ?” – you can, but a normal UPS has a battery and in order to power your equipment it has to take the battery power (DC), modulate it, send it through a step-up transformer and out to your device. Your device will generally take that AC 240V, step it down, rectify it (demodulate it) to DC and then use it. By stepping up and back down again you’re introducing a lot of inefficiency into the process, which translates into bigger batteries and big equipment. Mikrotik routers (like many routers) expect 10V-30V input – so when the power goes out and a MUPS is in use, the MUPS simply directly connects the battery to the router. The product is a simple battery can power a small Mikrotik router for several hours with almost no heat output and complete silence.
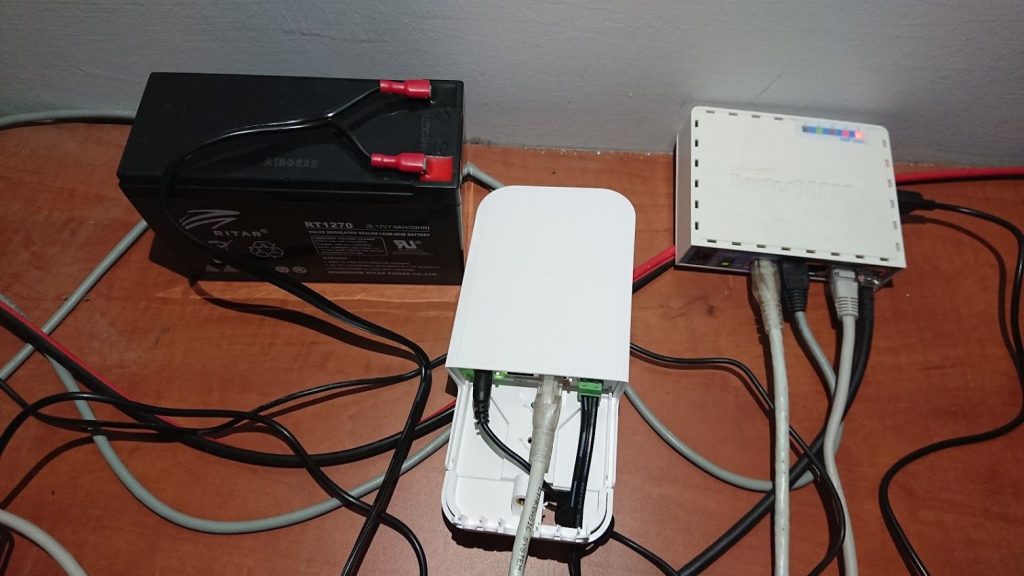
A 12V 7AH battery, Mikrotik MUPS with cover removed and Mikrotik HAP 802.11AC dual band router.This thing is a beast – and works well on a MUPS despite the datasheet indicating otherwise. (Mikrotik RB4011)
Installing the Debian Buster preview image is easy, their wiki pretty-much does everything for you :
I found I had to do a few things to get things running smoothly :
Set a timezone : tzselect
Set the hostname and associated hosts entry : /etc/hosts and /etc/hostname
Install locales : apt install locales
Install dpkg-reconfigure : apt install debconf
Reconfigure locales : dpkg-reconfigure locales (this gets rid of the missing locale error message)
Install some other stuff : apt install ntp build-essential byobu atop htop sudo
That’s what’s hosting this website.
If your Pi is on a reliable battery-backup* you can enable write-caching :
In /etc/fstab :
LABEL=RASPIROOT / ext4 rw,async,commit=500,noatime,discard,nodiratime 0 1
rw – read/write
async – asynchronously read and write (dangerous with a battery)
commit=500 – the amount of time the fs waits before forcicbly flushing buffers to disk (500 seconds)
noatime – don’t update access times on files
discard – use the TRIM command to tell the SSD what blocks are no longer in use (this often doesn’t work, but I’ve found it works on high-end modern Sandisk and Samsung SD/MicroSD cards)
nodiratime – don’t write the access time for directories
To install docker-compose you’ll need python3 and pip : apt install python3-pip python3
and then “pip3 install docker-compose”. It works beautifully.
And that’s about it. You may find that some common images don’t have variants available for arm64, but rebuilding them is educational in itself 🙂
Often cloning the repository associated with the image you want and then running “docker build -t mynickname/a-project:version .” is enough to generate arm arm64 variant of the project. You can then push the image to docker-hub for use with docker-compose by going “docker push mynickname/a-project:version”. You may need to log in first though : “docker login”.
It’s amazing what low-end hardware can do. And this is behind a firewall in a DMZ – so don’t worry about those 0.0.0.0s.
And yes, one might argue that publishing the above is a security risk… but then one might counter with “obfuscation isn’t security”.
Not bad for a machine hosting 9 websites. The SSD is an “endurance” SSD, so a bit of swapping shouldn’t be a problem.
A side effect of this process was the discovery that Ghost is a real RAM-hog and CPU-inefficient. WordPress uses < 10% of the RAM Ghost uses… and the WordPress sites are a lot more complex. WordPress also responds faster than Ghost, so it may be time to switch.
This is a quick deep dive into home automation with Home Assistant. Home automation is a very wide and complex topic, this post is mostly an overview of what I’ve personally found possible so far.
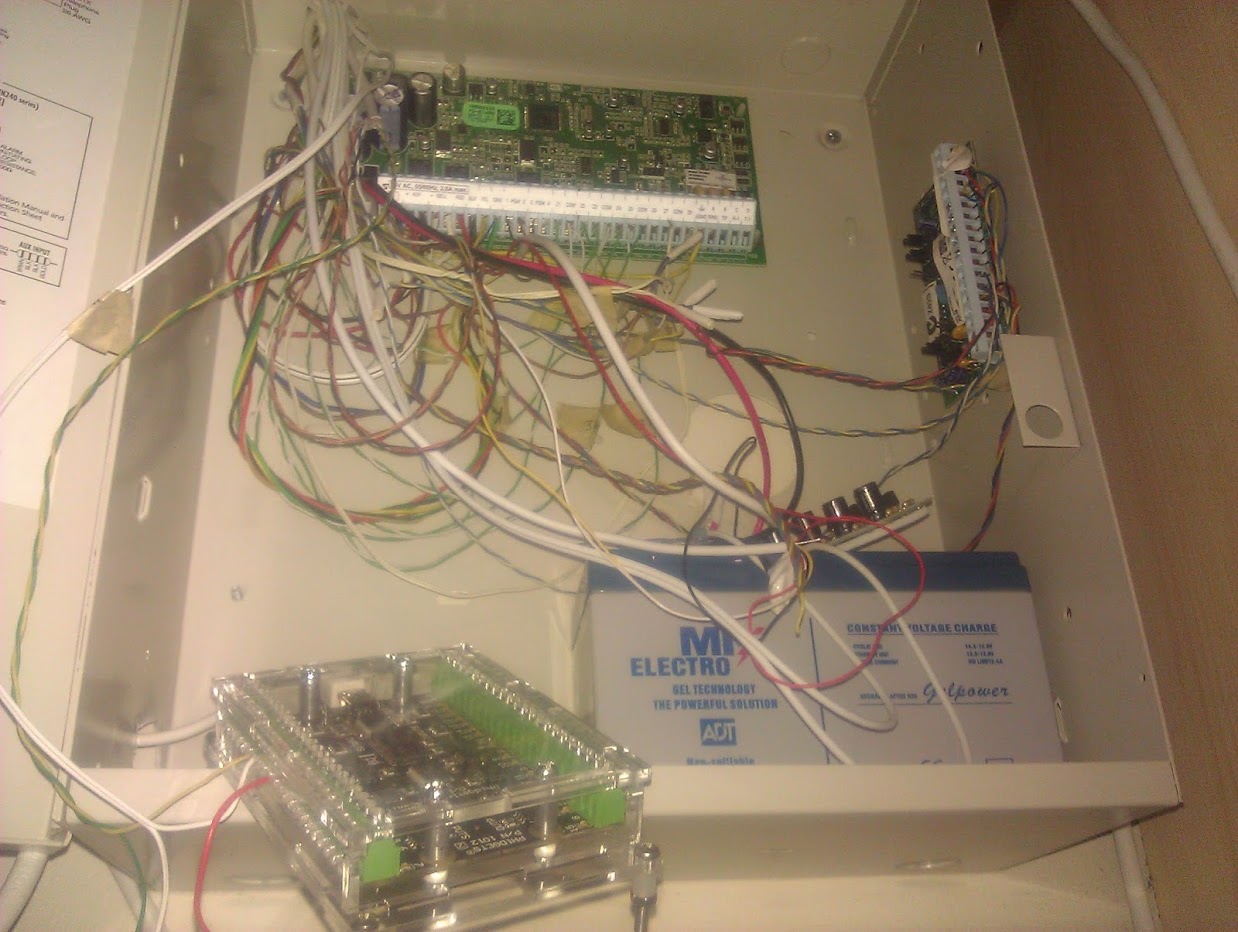
I bought my house back in 2011. The garden came with an irrigation system, but no valves and no automation. I went looking for valves and a suitable controller… but they were terrible; they had horrible LCD displays that required cryptographic experience to interpret and they cost a ton. The house’s alarm system also sucked. I never figured out how to operate it.
Back before Raspberry Pis if you wanted TCP/IP you needed a Phidget component.
Irritrol. It’s disgusting.
This was 2011 and that meant there were no Raspberry Pis. I automated the garden irrigation system by using Arduino (Atmel Atmega328P) MCUs, controlling relays on a long 100m I2C line around the garden. Using some tricks I managed to get the Arduinos down to 500 Hz and that was reliable enough.
Fortunately, things have changed; 2012 came, the Raspberry Pi 1 hit the market and suddenly these devices could be networked using Ethernet for a fee that wasn’t insane. Then came 2016 and the WiFi-enabled Espressif esp8266 MCU graced us with its incredible price point of ~$4.00 and tiny size. Initially your coding choices were Arduino or Lua but eventually MicroPython took away that world of hurt. MicroPython RAWKS.
Circa 2016, a very untidy ESP8266 borehole controller, temperature/humidity sensor and irrigation valve controller.
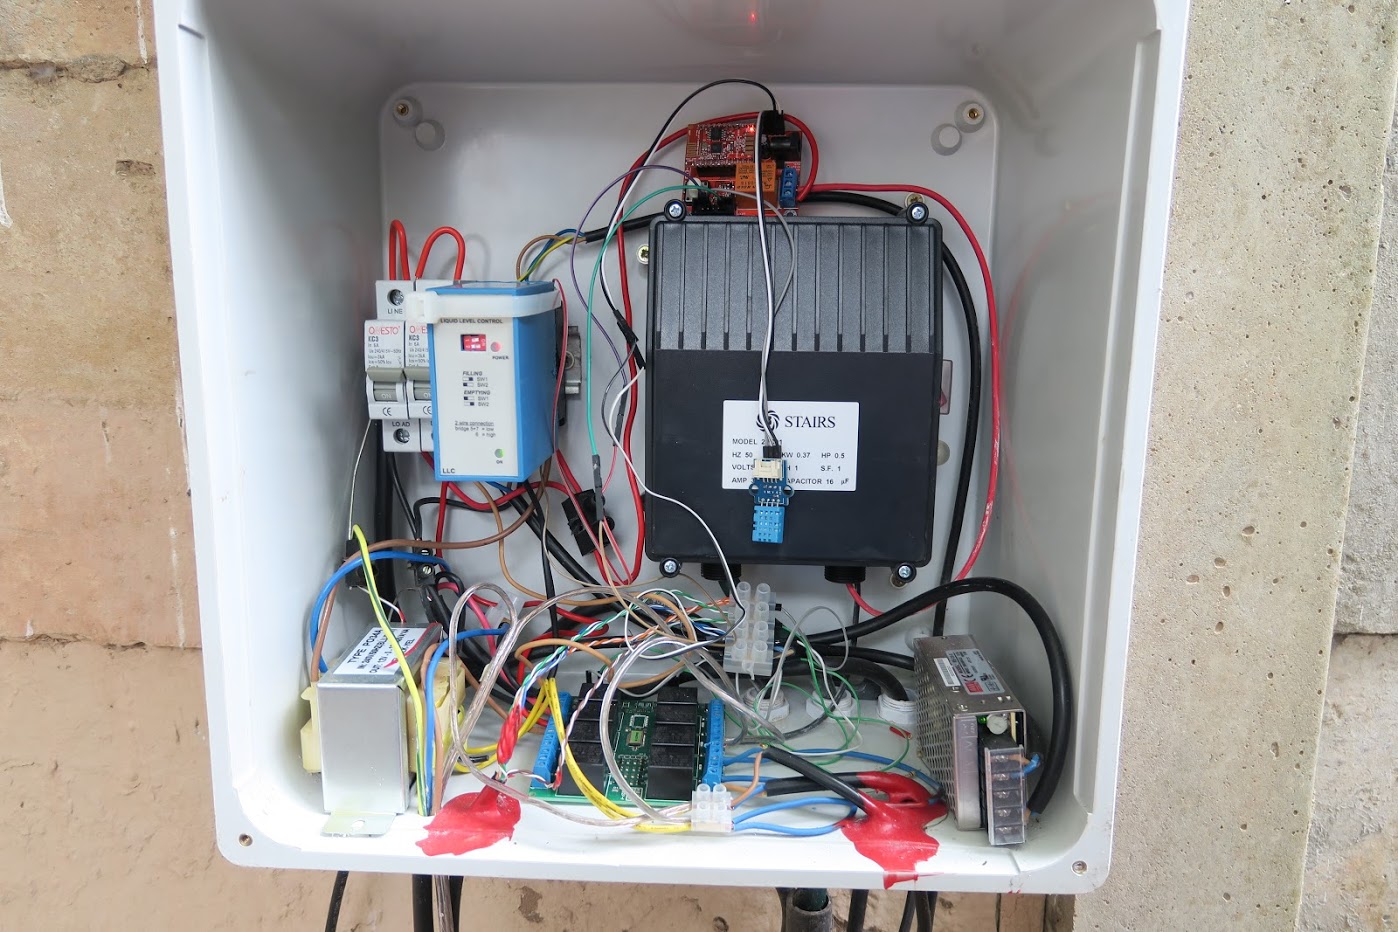
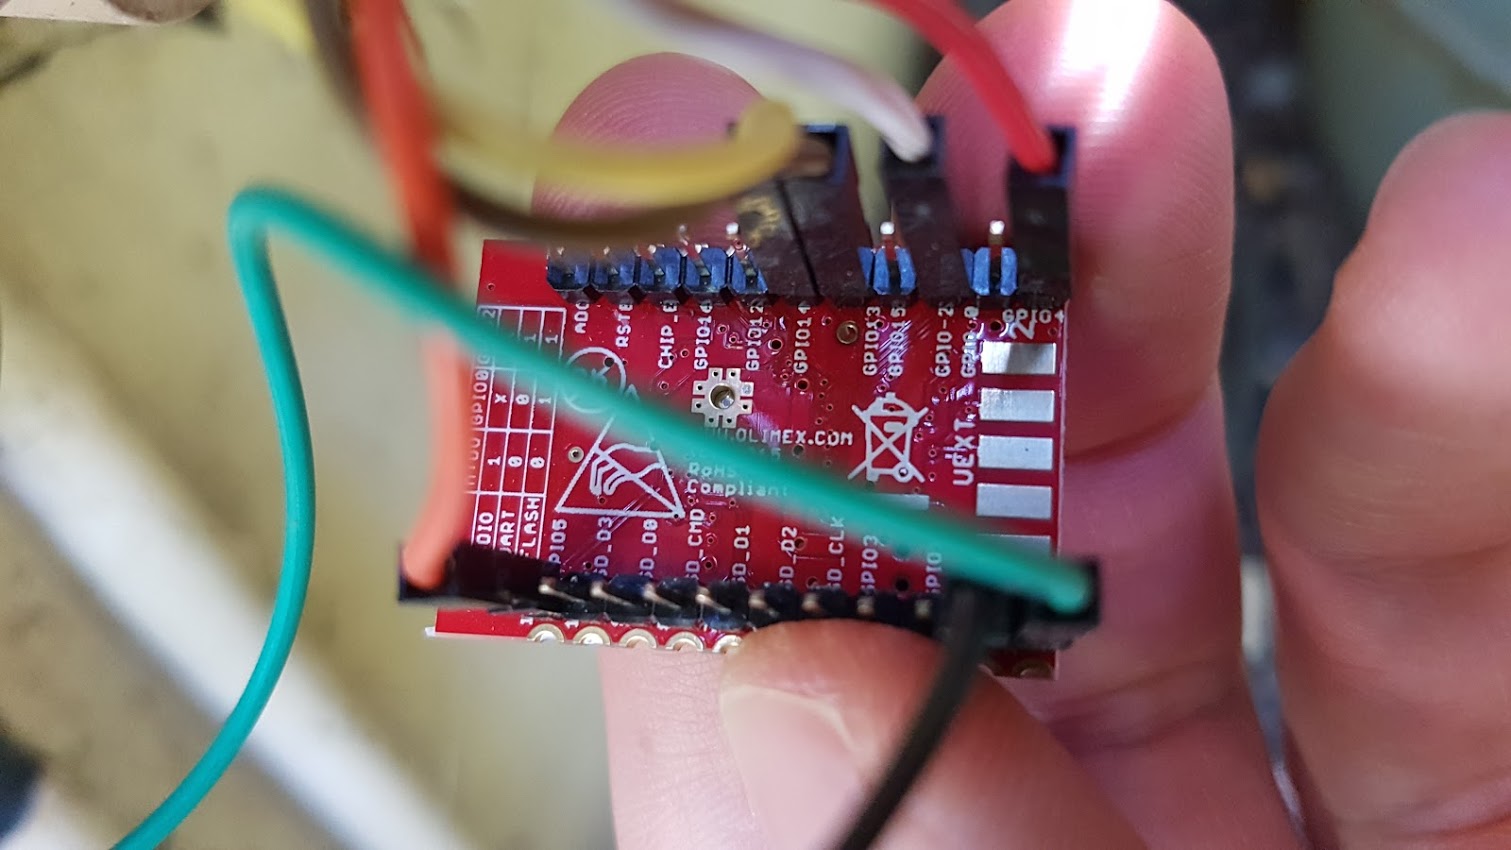
Olimex’s take on an esp8266 – this one controls lighting, a pool pump and monitors sand filter input pressure.
At this point I had automated some parts of my home, but all using bespoke code, communicating through an MQTT broker/server. This worked, but it wasn’t user-friendly. Great for cron-based irrigation control, crap for turning on lights during an evening with friends.
The pool pump never turns on at the wrong time.
Then, per chance, I came across Home Assistant. Initially I wanted to use it with a hacked Xiaomi Air Purifier (that’s a story on its own), but as I experimented with it I realise it had the ability to radically improve the usability of my existing home automation. I decided to give it a proper try and started configuring it to talk to my existing devices.
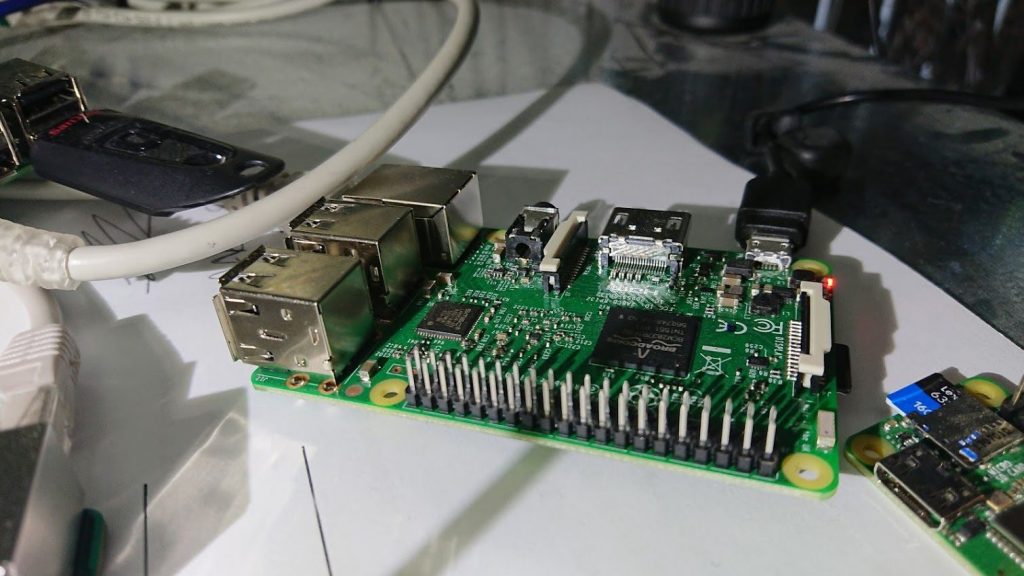
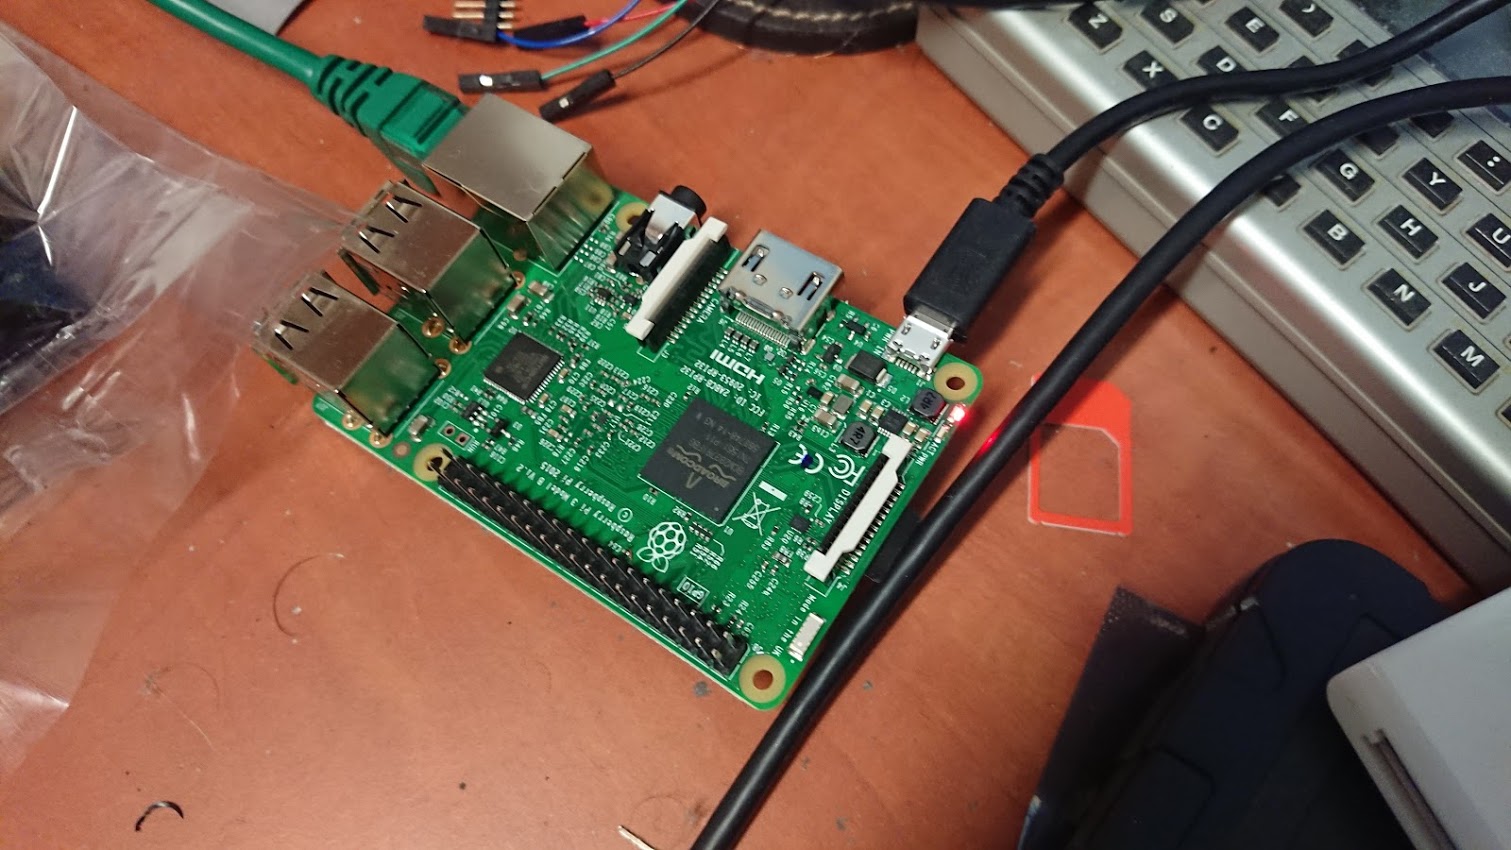
The first Hass experiment was a lonely Raspberry Pi 3B with a super crap 16GB Sandisk MicroSD card. Even in this configuration both Hass and InfluxDB were completely usable.
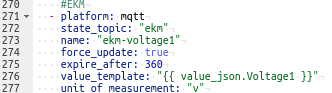
All my stuff was JSON-MQTT based in that my home-grown devices emitted (and ingested) JSON payloads via the MQTT broker. This was trivial to hand to Hass thanks to Hass’s “value_template” configuration directive:
A sample of Home Assistant’s JSONPath value templating for an electricity sensor that measure utility voltage.
Hass’s web-frontend representation of the compound results of the above sensor.
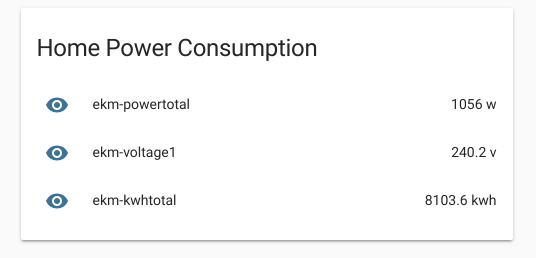
The sensor above is an EKM power meter, running on an RS422 bridge. A Golang application I wrote, running in a docker container on Hass talks to the meter via the bridge and sends the results to Hass via MQTT as a JSON object. Home Assistant is a collection of docker containers running on a machine (in my case an Arm single board computer).
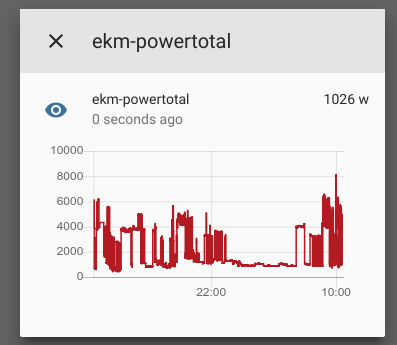
A neat graph showing power consumption over the last 24 hours.
Hass has basic graphing functionality built-in, but for SUPER COOL FUN I installed the InfluxDB/Chronograf “add-on”.
I had never heard of InfluxDB… damn it’s cool:
Interactive graphs rock. This one shows power usage in watts.
I could sing InfluxDB’s praises for a long time… it’s unbelievably cool… but I’ll leave that for another day.
I neeeed moar GRAPHz…
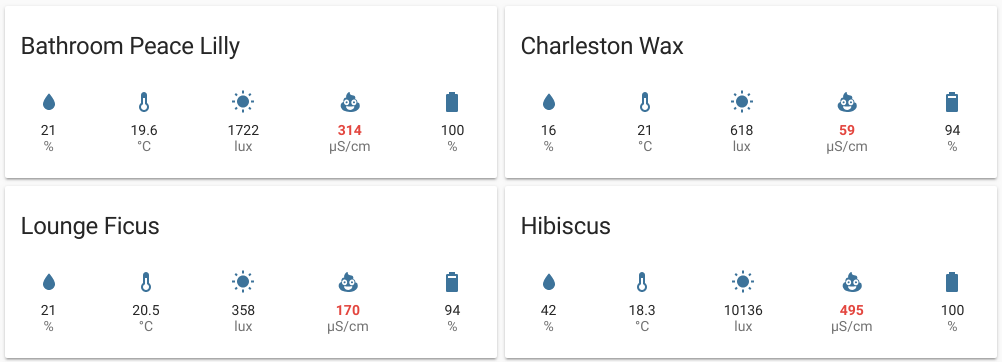
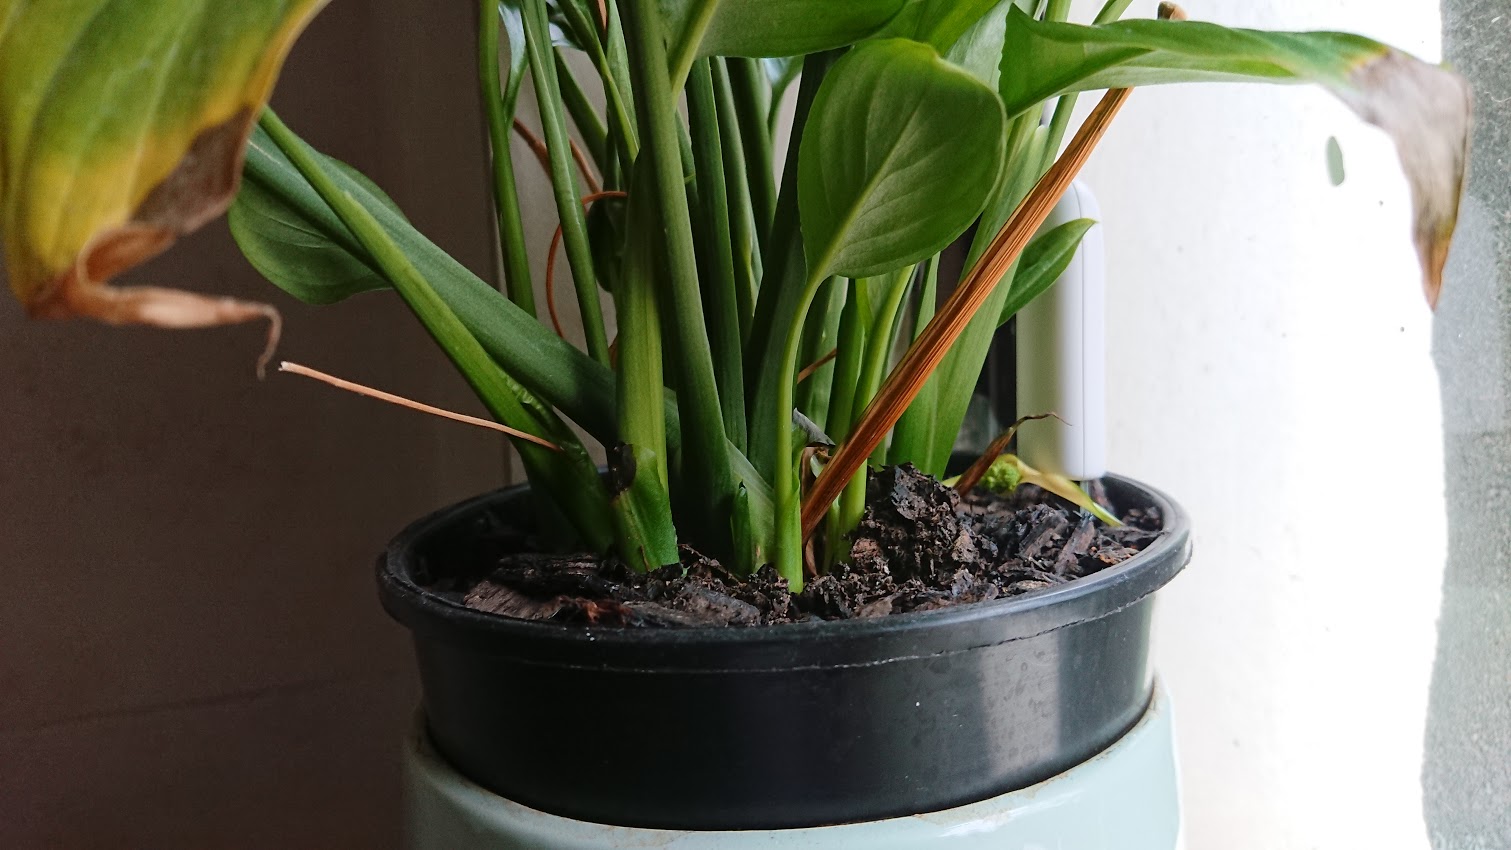
It’s like eating candy and has similar health issues. A Soil Moisture Sensor rendered in Grafana from data in InfluxDB.
Did I mention the soil moisture sensors ?
A small subset of soil moisture sensors in the house and garden. Also, gotta love the poop emoji.
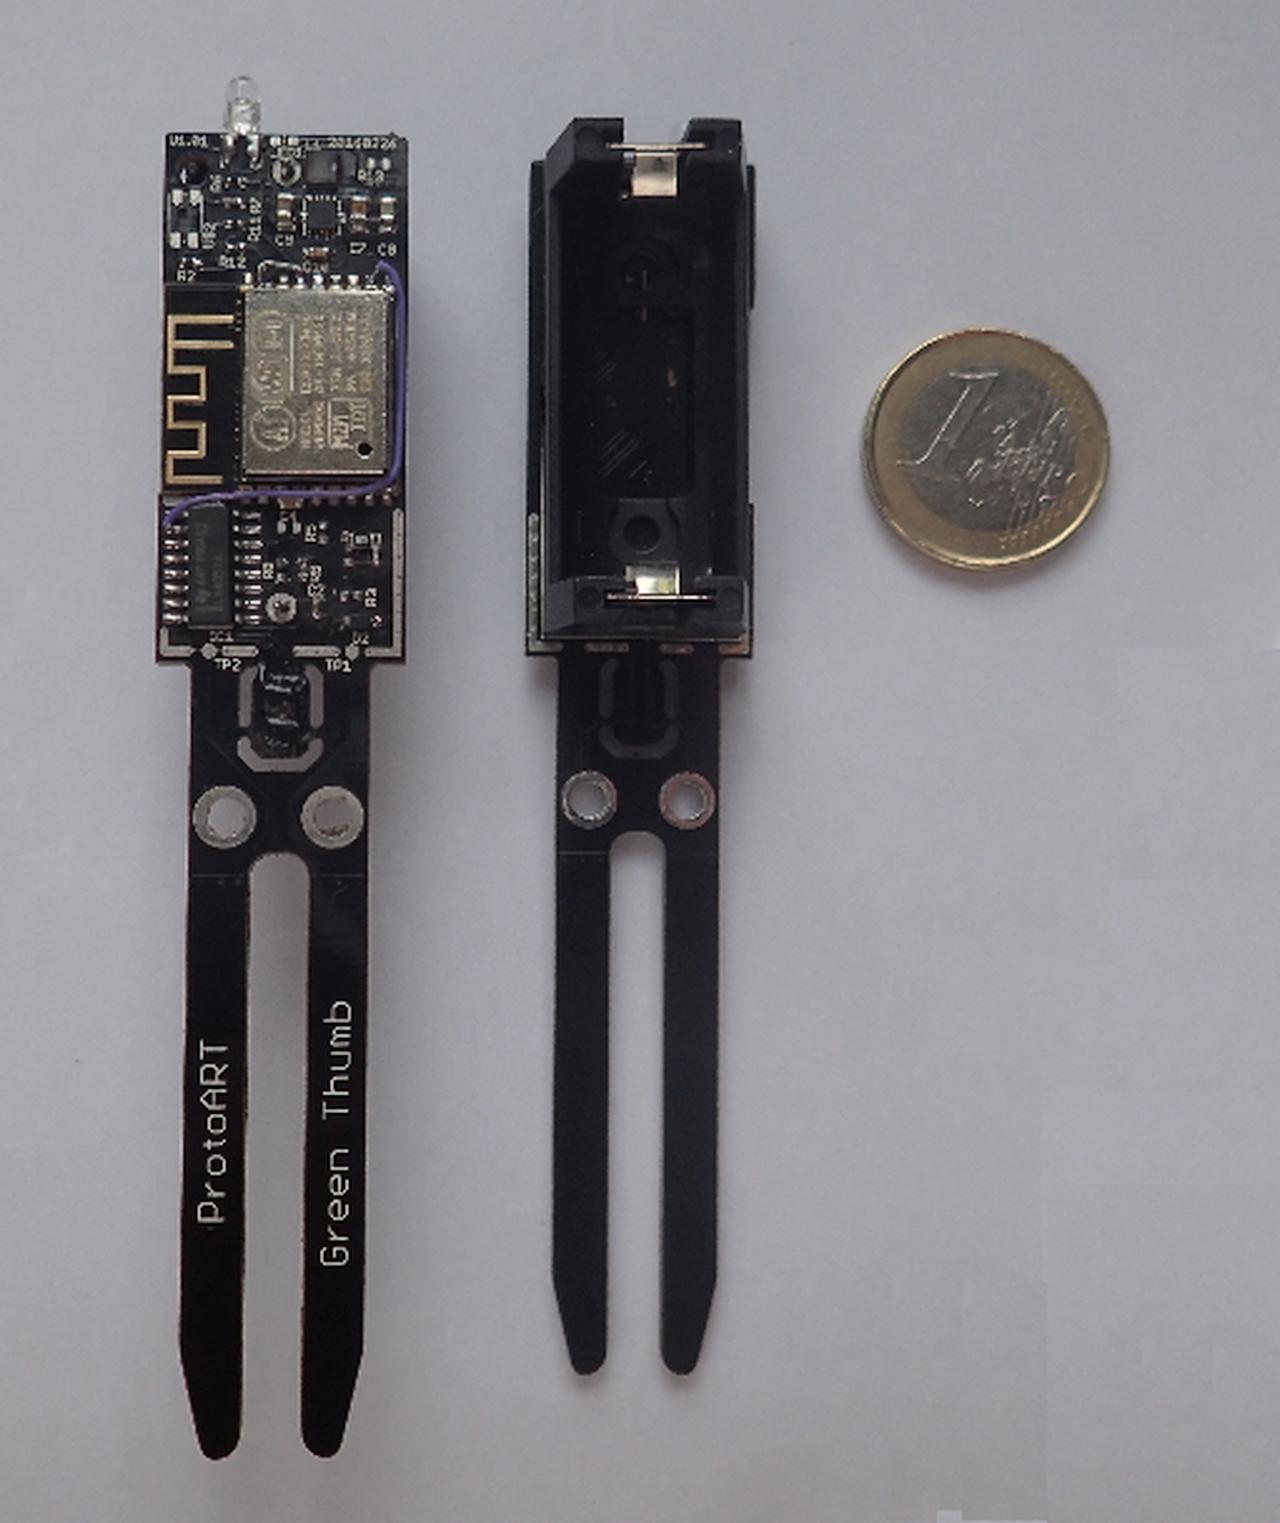
For ages I had been looking for a soil moisture sensor solution, but they were all terrible and relatively expensive. I started with the Chirp from Tindie… but they aren’t wireless, they’re bare boards and as such they don’t last.
Dope.
I then tried an awesome solution by “ProtoArt” on Tindie called the GreenThumb (these are no longer for sale). These are esp8266 based. They worked really well and had some cleverness built in (frequency-resonance sensing of soil constituents), but it was also a bare board and esp8266s aren’t known to be light on battery use.
It’s 2019, enter…
The HHCC (also branded as Xiaomi Flora) soil moisture sensor. This is Bluetooth Low Energy-based. It does moisture, conductivity, light and temperature. It is rain-proof (it has internal seals), relatively affordable, aesthetically unobtrusive and critically the capacitance plates are embedded in the PCB, so should last a long time (compared to the Chirp probe where the sensing plates are traces on the outside of the PCB). Some awesome people have teared down the unit and the protocol is well understood.
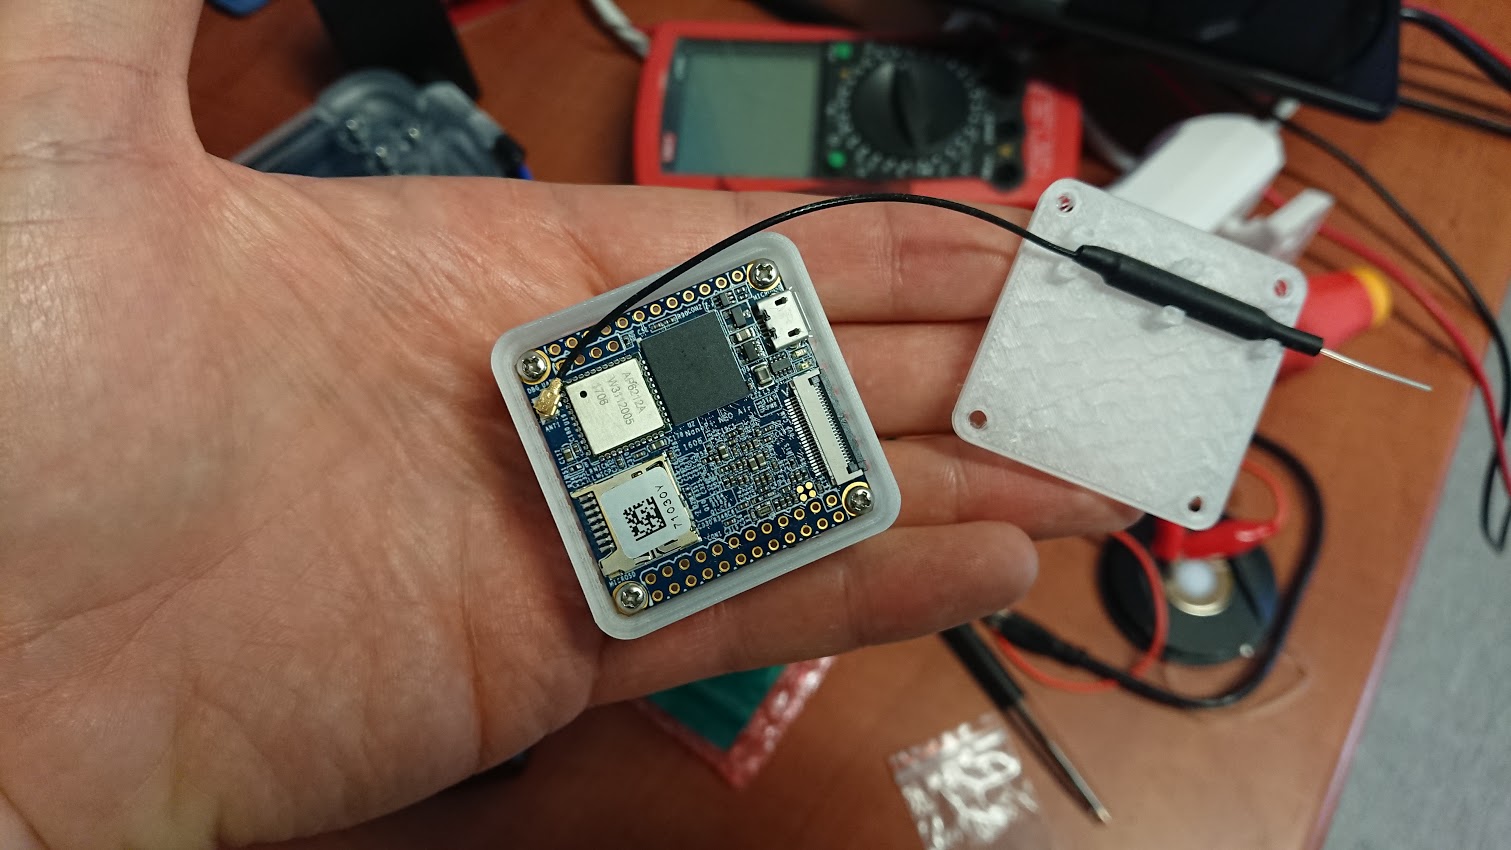
A NanoPi Air by FriendlyArm. This is a quad-core armhf machine with embedded WiFi, Bluetooth and an onboard eMMC device.
It runs nicely on a Mikrotik Router’s USB port. WiFi and soil moisture sensing.
Spot the soil moisture sensor.
All of these things can (and are) beautifully abstracted out into the Home Assistant web frontend, which runs nicely in both desktop Chrome and my phone’s browser. This got me thinking, maybe I should bring EVERYTHING into the MQTT broker?!? It’d have to be done properly because visions of the Mr Robot scene where a house goes bezerk are a real possibility where everything can be hacked and remotely controlled. Securing a home IOT network is an interesting topic on its own… maybe I’ll write about that next.
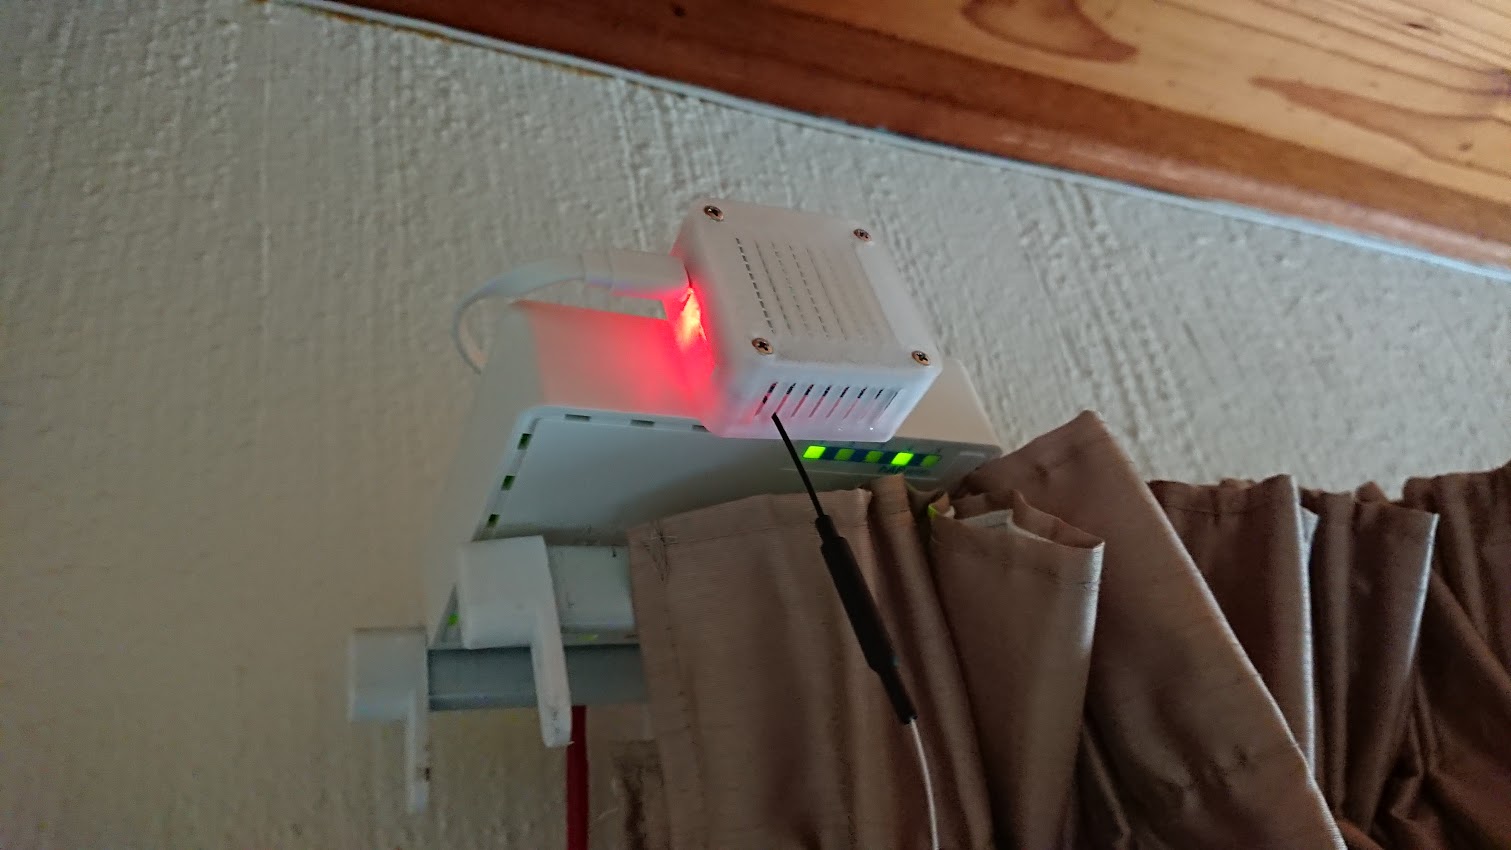
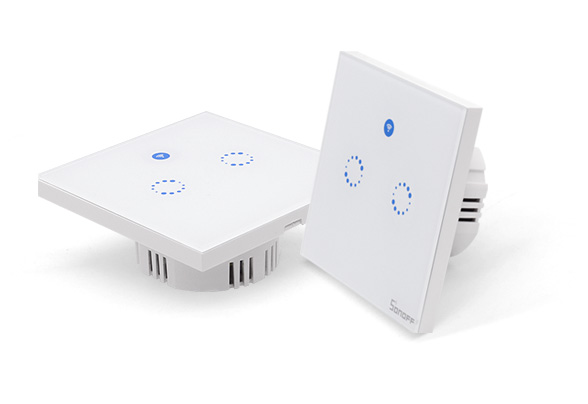
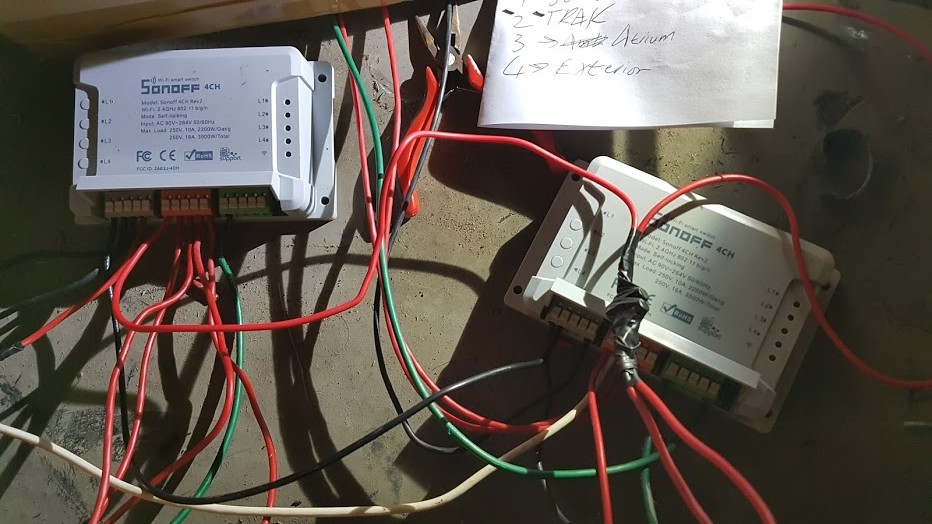
Back to apocalyptic home automation: A company called Itead makes a variety of switches which are meant to replace normal wall light switches. Crucially, these devices all use esp8266s inside, which means, with some finger gymnastics, they can be reprogrammed with custom firmware.
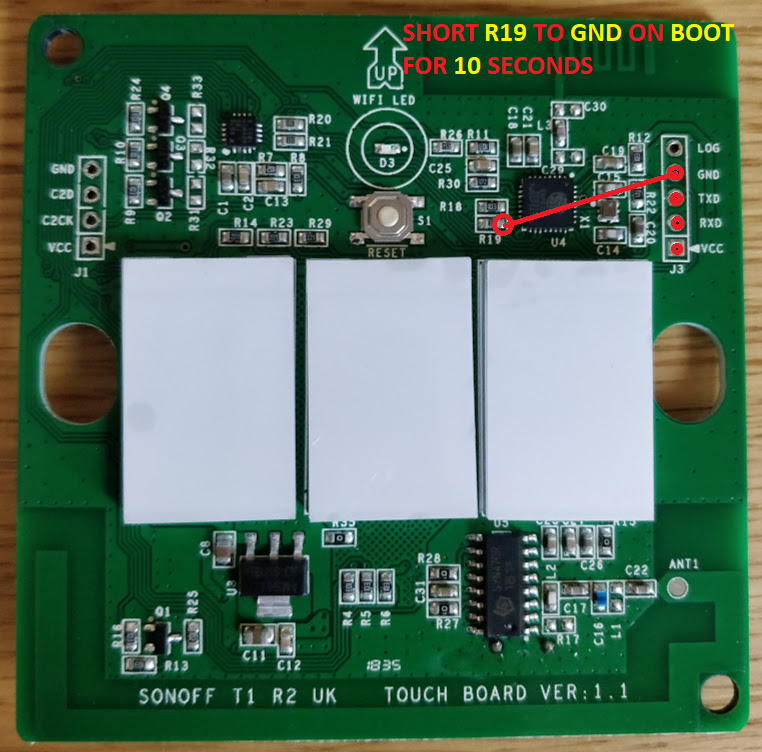
Yeah, you have to short R19 to ground during flashing, lots of fun. Also be sure to clear the RF MCU memory to avoid “ghost” switching 😀
The result of abstracting physical lights using MQTT as an API of sorts and Hass as a frontend.
Unfortunately, my house was built in the 80s and Sonoff devices need a neutral line to function. The idea of putting a neutral line in a light switch wall unit in the 80s would have seemed silly because switches only switch loads, they aren’t loads in and of themselves. Rewiring my house to have smart light switches has been a trial.
And some of this required work in the roof…
This was really quite painful.
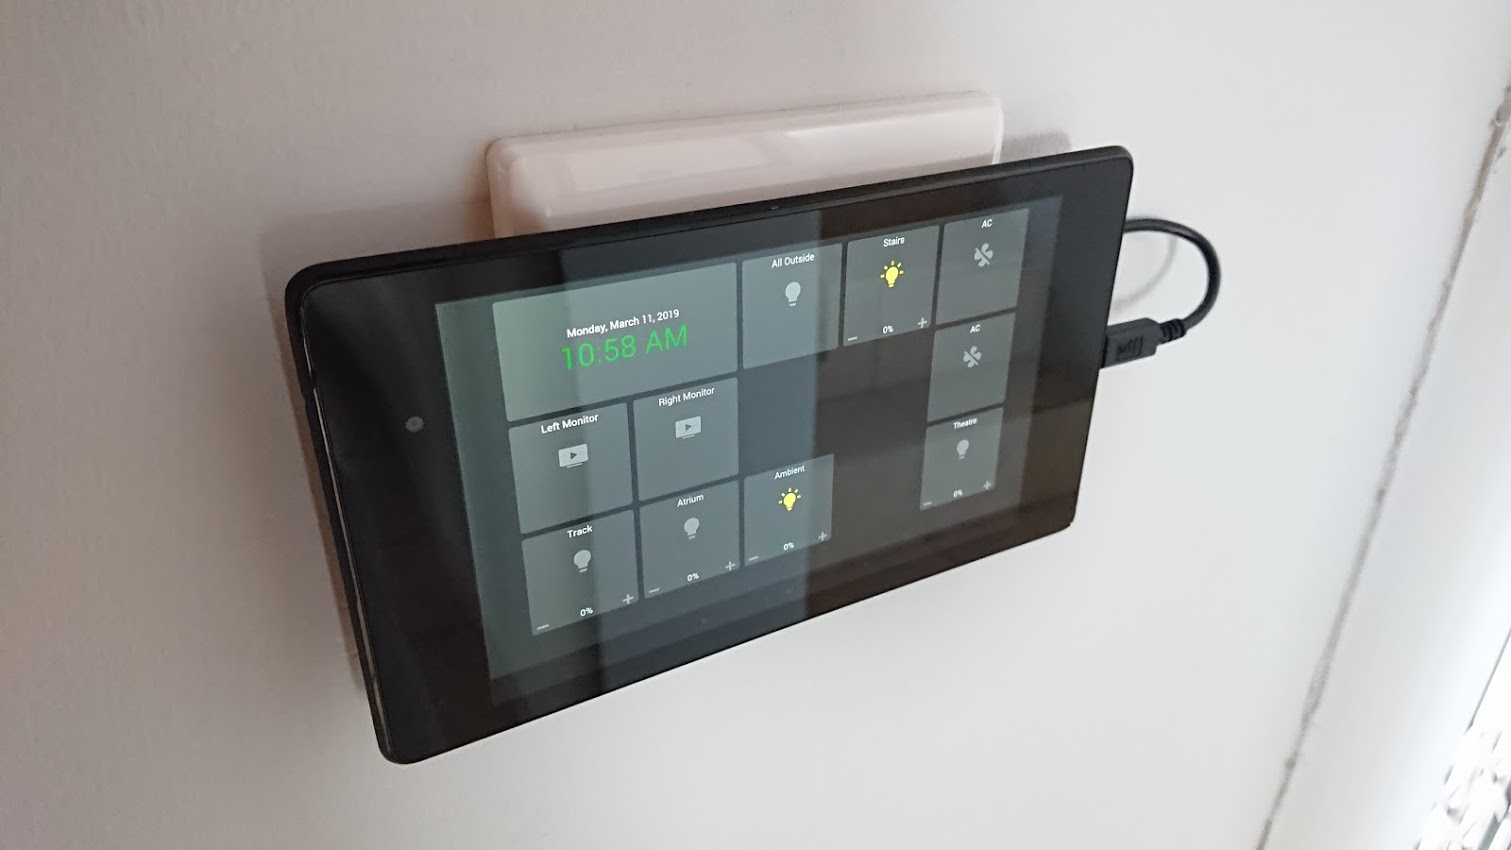
But, now we have this:
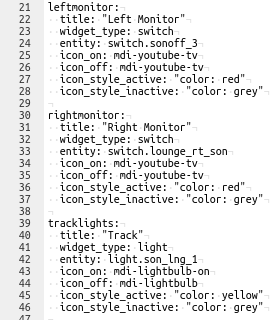
Yes, the air-conditioning is also controlled by Hass. It gives me tremendous pleasure to find a use for a tablet computer from 2013 that has sat gathering dust for years. The light plate behind it used to house 5 switches, all of which have been abstracted and reconfigured in various ways. The tablet itself is stuck on using velcro and is powered by an over-specced PSU in the wall. The tablet is set up to limit the charge of its battery to extend the life of the unit. The interface is a web-app being run on the tablet by WallPanel (an open source app by ThanksMister). The web part of the interface is called HADashboard. This is what the YAML for it looks like :
The layout portion of the HADashboard YAML, which relies on additional definitions.
Some of the definitions used in the dashboard.
This system knows when my phone is on the network, it knows when there’s movement in the house (by virtue of being the alarm system – more on that later) and it can switch pretty much everything. The result is, I don’t have to turn on or turn off lights and when I do want to turn things on an off, I can do it from my phone, anywhere there’s internet connectivity. Once again, this is a complex subject suited to it’s own post.
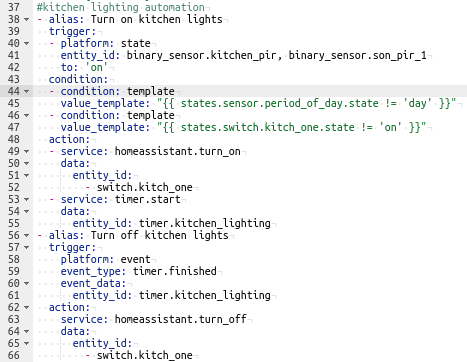
An example auto-lighting automation. It needs some work, but it’s functional.
I hope you enjoyed this quick dive into obsessive home automation with Home Assistant.
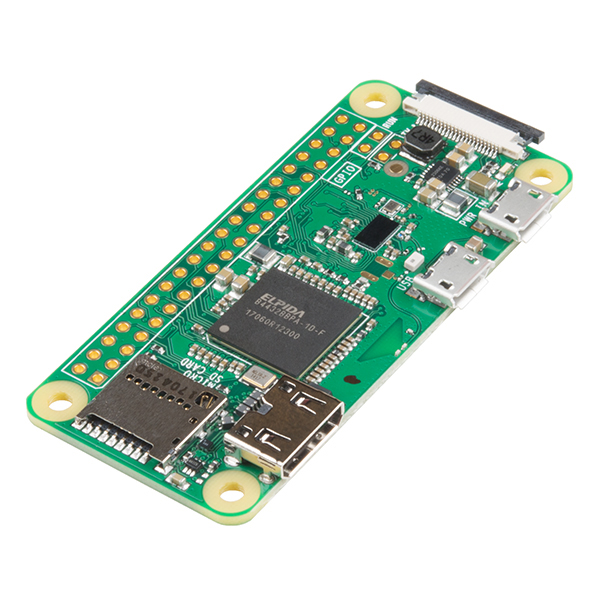
Getting HD video from one point to another, wirelessly and with low latency/delay isn’t cheap. The best-known player in the market, currently, for these kinds of tasks, is Teradek with their BOLT range. Unfortunately, an entry-level Teradek Bolt goes for around R 37500 in South Africa (about $2690). This isn’t affordable in a number of contexts, and as such I tried my hand at finding a cheaper solution.
A “cheaper solution” invariably involves commodity hardware, specifically commodity hardware that is also modular and modifiable – so open source. It’d need to be something supporting a wireless connection option. WiFi is ubiquitous, cheap and highly flexible.
This tiny little PCB runs Linux and handily has a built-in H.264 encoder as well as Bluetooth and WiFi – cool! The RPI Zero W also sports a camera connector (Camera Serial Interface or CSI) and that got me wondering: had anyone found a way of getting video from an SDI or HDMI cable into a Raspberry Pi via the CSI interface ? The CSI interface runs directly to the GPU (which does the encoding) and therefore cuts out common CPU-intensive issues that arise when using USB interfaces.
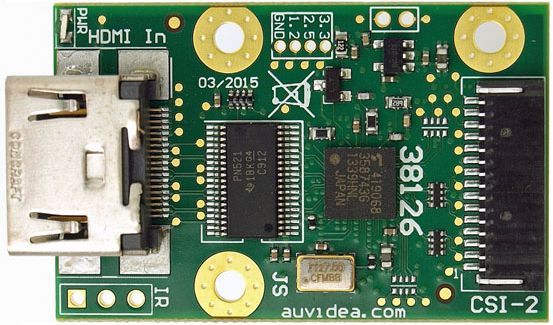
Ah yes, the B101 HDMI to CSI adapter, made by Auvidea. This board handily converts an HDMI stream into a stream that looks like a CSI camera. This board looks like it’s Plug ‘n Play but I soon found out that that wasn’t the case.
Tons of trawling through various forums resulted in me eventually coming up with a partial solution.
You’ll need a specific copy of Yet Another Video4Linux Test Application (yavta). This Yavta sets some registers on the video encoder, starts the pipeline and reads out the results to stdout. That stdout can be redirected easily, I used socat (like netcat) to send the output out to another machine via UDP. This is the final command :
Run ./yavta -c -f UYVY -n 3 --encode-to=- -m -T /dev/video0 | socat - udp-sendto:10.0.0.20:5000 on the Pi and ffplay -probesize 32 -sync ext -fflags nobuffer -flags low_delay -framedrop -strict experimental -i udp://10.0.0.20:5000 on the receiver
But, before running this command you paradoxically have to provide an EDID definition to the V4L drivers, like so :
The weird part is that this works for any resolution and frame rate provided it is progressive (not interlaced) and is part of the HD-family of resolutions (namely 1920×1080 and 1280×720, I haven’t tested the ugly sister 1440×1080).
Audio, via I2S requires a whole new realm of heartache and I found it to be generally unreliable.
The result is a feed which shows a delay of 10 frames on a 1080P 25fps stream. This is about 400ms – which isn’t great, but considering it’s going from a camera, through an encoder, out via WiFi to an access point, through a switch, through a router, through a switch and then being decoded on another machine, I think the result is a decent first start.
The next step is to experiment with low latency options in the Pi’s H.264 encoder and also test the latency when the link is peer-to-peer.
The most interesting indication I’ve found of low-latency GOP options on the encoder is the register
Recently, AuroraDAO launched their tier 3 staking for their decentralised exchange, IDEX.
The software required to participate in their staking system is relatively simple; it takes the form of a docker-compose recipe that launches three containers, namely Parity (in light mode), MySQL 5.7 (not MariaDB) and a container running their software on Node. I tried running this software on an Intel i5 NUC thinking that it’d require some reasonable hardware to work properly. Some users started asking if it was possible to run aurad on low-power hardware, like a Raspberry Pi. Initially I thought this wasn’t viable… but then I started looking at the utilisation on my i5 NUC and realised it had barely any utilisation – staking on a Pi might be viable after all…
As an experiment I set about trying to get aurad running on an Asus Tinkerboard, which is a 32-bit quad-core arm device with 2GBs of RAM (1.8 GHz default clock). The result was successful and aurad runs really well on it. I then rebuilt the aurad setup on a testing image of Debian’s Buster release, which is arm64… and surprisingly that also works really well. Amazingly the arm64 architecture has better support than armhf (32 bit) in a number of areas.
So for those who are willing to get their hands a little dirty, here’s everything you need to get started with aurad and a Raspberry Pi 3B:
Decompress and write the image to a suitable microSDXC card. You’ll need something that’s at least 32GBs in size. I based my tests on a Samsung EVO+ 128GB microSD card. Note that your Pi3 will have to work very hard to run this image, so make sure it has a good quality power source. I’ve been powering mine through the headers directly.
Once the image has been decompressed and written you can stick the SD card into your Pi and power it up. It’ll get an IP from your DHCP server (I haven’t tested it with wifi). Once it has an IP, log in :
ssh debian@yourpi (password raspberry).
Once you’re logged in, configure aurad :
aura config
Once configured, start aurad :
aura start
It’ll take a little while for the containers to start and then it’ll take some time for the machine to synchronise. You can check the sync progress by running :
docker logs -f docker_aurad_1
aurad running on a Raspberry Pi 3B with an arm64 kernel.
RAM is a bit scarce on the Pi3 so a swap file is a good idea (most of the RAM contents are inactive). This is after 6 hours of uptime. The machine seems to limit itself to 540MB of real RAM usage.25% of the system RAM is being used as cache… which isn’t undesirable.
It should go without saying that Aurora doesn’t support this image and that by using this image you’re trusting I haven’t embedded something funky in the images. Also, updating the containers will involve a little bit of fun.
You shouldn’t need a heatsink for your Pi; my Pi says it’s running at 55 degrees C currently (in a 26 degree C room).
The major resource hog is Parity, which is responsible for around 20% of the machine’s RAM usage. I suspect moving Parity to another ARM SBC would free up a lot of resources, improve stability and would still use far less electricity than a “normal” x86 machine (10W vs 100W?).
and it goes on and on… so the lesson is don’t trust Indiegogo, even if the campaign in question looks legit, because Indiegogo don’t give a flying fuck.
The actual story: my main laptop is getting a bit old and its batteries have started to do the sudden-death dance. Unfortunately they’re also near-impossible to replace, so I figured the GPD 2 could be a nice replacement; it wouldn’t break the bank, it’s reasonably powerful, tiny… perfect.
I ordered one off Indiegogo, the vendor (GPD HK) decided to ship all their US orders first – a bit cheeky, but no worries. Eventually they did ship my unit (amazing that someone actually shipped their product) but GPD went and under-declared the item’s value by 3.4 times, nice. The South African Revenue Service’s Customs/Border Control thought $180 was a bit on the low-side for a laptop and stopped the parcel. I exchanged e-mails with a customs officer through a DHL agent over the course of two weeks, during which I was completely honest and upfront with everyone concerned. I had to badger them, they never spontaneously e-mailed me.
The gist of it is that SARS requested evidence of the value of the item, which I provided in the form of the Indiegogo order confirmation e-mail. I should point out that it is trivial to fake this, and many people do.
In response, the SARS agent produced a comedic nugget : “provide an explanation from the importer as to why the goods in this consignment was under declared for US$180.00 when it has an actual value of US$609.00.” – seriously ? because everyone routinely engages in mind-reading.
My response : “I do not have an explanation for the discrepancy; I paid for the item some time ago and only recently got a notification that the item had shipped, beyond that I haven’t had any communication with the vendor. I did not request that the vendor under-declare the value of the parcel”
The customs official : “ask the importer to get an explanation from the Vendor as to why they under valuated the goods.”
Which I did lol, and GPD responded : “in order to avoid high tariffs, we declare the device as a laptop,and the price is $180, shipping cost is $15, for a total of $195.” GPD’s response just goes to show how, to them, under-declaring an item’s value is completely normal and by extension there’s nothing wrong with that practice.
Fast forward two weeks, ~20 e-mails later and SARS has done what I expected: they’ve put so many duties and penalties on the item that there is no equity in the item and therefore the only logical action to take is to abandon the package.
A love letter from SARS which can be summed up as “pay us a crapton of money or the precious gets it!”The important part of Section 84 of the Customs and Excise Act of Apartheid South Africa 1964
Of course, DHL also wants their cut; so taxes, administrative charges, penalties (which are also taxes) and the neighbour’s dog food costs for this item now sit at R 7070.68 . Someone has to pay for all those luxury cars.
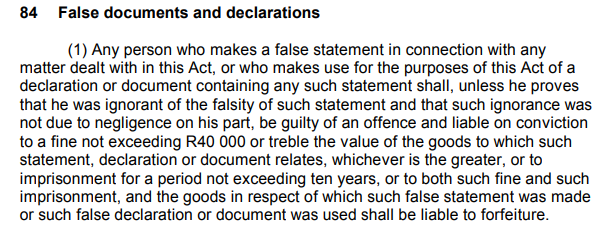
Reading the act, the part that scares me is the “who makes use for the purposes of this Act of a declaration or document containing any such (false) statement shall, unless he proves that he was ignorant of the falsity of such statement and that such ignorance was not due to negligence on his part, be guilty of an offence and liable on conviction to a fine not exceeding R40 000… treble the value of the goods… imprisonment for … ten years” – Scary, which is what you’d expect from an apartheid-era law.
I didn’t know that GPD had under-declared the value of the item, but by initially paying the customs duty DHL advised me to pay, was I “making use of a document containing false statements” ? Assuming I was ignorant, was I also negligent ? Does DHL have a duty to make me confirm the customs value of items I import ? I’ve gone and checked and DHL did not provide me with the value of the item during their initial request for a customs duty payment and I’m not sure it’s reasonable to expect a member of the public to know and understand SARS’s complex duties calculation to the extent of being able to reverse engineer an amount calculated with it – so short of requesting the declared value from DHL, there was no way of knowing what the parcel’s declared amount was.
Well, I won’t pay and here’s hoping that’ll be the end of it from my side. I’ll abandon the package and then GPD, because you misdeclared the item, the ball is in your court; you can either refund me or send me a replacement, but correctly declared this time 😉 and if you don’t, I’ll do a chargeback.
The question is, who’s winning here ?
GPD don’t care because I’m probably 0.01% of their customer base. If this happens too often they’ll just stop shipping to South Africa. So they’re not losing, they’re winning.
I lose because of the inconvenience of, yet again, GOVERNMENT doing everything they can to (1) squeeze more money out of me and (2) make business difficult – because that’s what makes for a successful country. It’s really important to protect the local ultra-netbook industry (mostly owned by the Guptas btw). I also lost out on the initial customs duty payment.
DHL wins the most because they retain their fee for shipping the parcel and the initial amount I paid for customs duty (this amount almost certainly won’t go to SARS).
SARS loses in every way; they won’t get any customs duty on the parcel, a staff member has had to spend time dealing with this case, writing multiple e-mails and at least one official document. The government will -eventually- auction off the package in 6-9 months, by which time it’ll be worth radically less than it is now (and of course those auction sales are dodgy in-and-of themselves). SARS/the ZA government has wasted time and money dealing with this situation and in the process has helped create an illicit trade, increased incentives for providing false/fraudulent documents and stifled business.
AKA Reverse Engineering the Humon Hex Muscle Oxygenation Sensor’s Bluetooth Protocol
Athletes (or I suppose more generally mammals) have muscles. Muscles consume oxygen when they do work and output carbon dioxide into the host system’s blood. If insufficient oxygen is present, the muscle starts consuming glycogen, which is a somewhat finite resource and results in lactate as a byproduct of the consumption. Work done through the consumption of oxygen is aerobic work and work done with reduced oxygen is anaerobic work.
The transition between these two states is caused by a balance between a muscle’s ability to consume oxygen and the host system’s ability to supply oxygen to that muscle. Generally heart rate is the most-easily acquired indicator of whether or not the host system is struggling to supply enough oxygen to its peripherals, but heart rate has high hysteresis and varies per person, amongst other issues. As a result, Muscle Oxygenation “moxy” sensors are useful because they’re precise, provide absolute readings and they’re fast. They are analogous to reading a car’s engine RPM directly vs trying to figure out the RPM by looking at the water temperature.
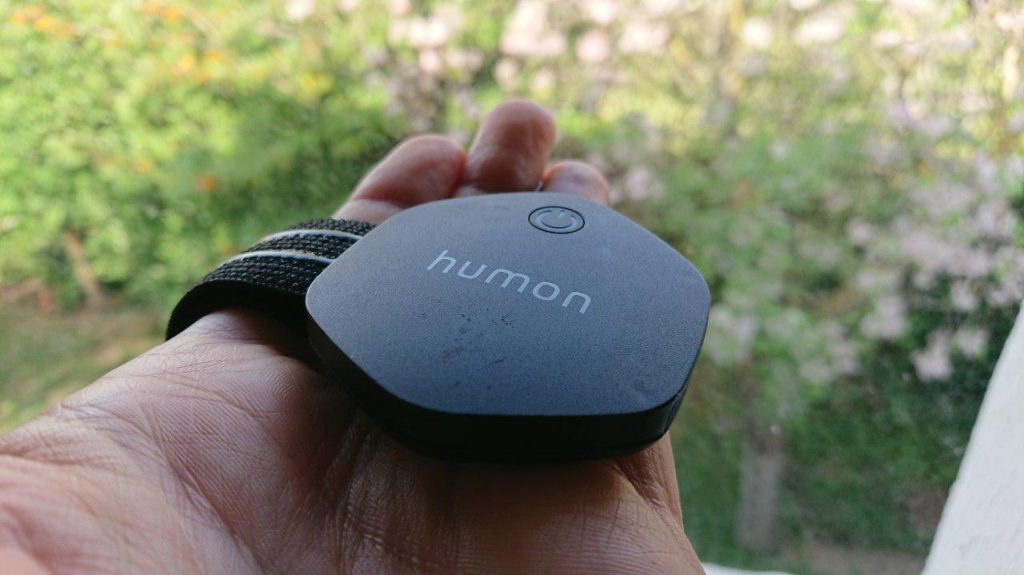
Unfortunately, moxy sensors have historically been very pricey with units like the Moxy and BSX Insight in the range of several hundred dollars. A coach told me recently that athletes generally go to a lab to be measured (?!). A new company on the block, called Humon, has released a product called the Hex and the Hex does moxy. The Hex is less than half the price of its competitors. It’s also small and modern, with wireless charging. It’s generally a very very cool device.
A Humon HexThe underside of a Humon Hex
The Hex transmits data on both ANT+ and Bluetooth Low Energy (BLE/Smart). The ANT+ variant of the data is standardised and easy to acquire if you have the correct radio to do it. The BLE variant of the data unfortunately is not standardised and Humon declined my request for the protocol specification… this guide is both to help others and a reminder to myself how the device works and more generally how to access BLE sensors on Linux.
I want a small logging device for my bicycle 😉 but I don’t want something that has a display because I don’t want to be distracted. I just want the data for later review, so the logging device should ideally be small enough to be tucked away in or under the bicycle’s seat. In order to achieve this I figured I’d build a logging device out of THE AMAZING Raspberry Pi Zero W. The Zero W has a built-in wifi and bluetooth radio but said radio doesn’t support ANT+ and adding ANT+ would increase the size of the device, look crap and use more battery power. Bluetooth Low Energy is therefore the best option.
Everything that follows should work on any device running Linux with BLE support and running a recent version of Bluez (5.40 up).
Start by putting the Hex on you, press the power button once to start it up. The LED will rapidly fly through some colours and then go red. Double-push the button, the LED will go blue and after a while, it’ll go green. Green seems to mean the device is both calibrated and transmitting.
Get yourself a screen/byobu session : screen Run bluetoothctl In the interactive console : power on – this powers on the BLE radio scan on – this begins scanning for hardware Wait for the device to show up as a detected device.
The hex will show up as “Hex XXXX”. This next step may not entirely be necessary : In the terminal enter : scan off – to stop the scan, we know what devices are present now agent on – this is to enable pairing authentication default-agent – this exchanges some keys but doesn’t ask for input pair 00:00:00:00:00 – replace the zeroes with the mac address of your Hex
The device should now be paired. connect 00:00:00:00:00 – connects to the device info – if you want some cool info: Name: Hex A2C6 Alias: Hex A2C6 Paired: yes Trusted: no Blocked: no Connected: yes LegacyPairing: no UUID: Generic Access Profile (00001800-0000-1000-8000-00805f9b34fb) UUID: Generic Attribute Profile (00001801-0000-1000-8000-00805f9b34fb) UUID: Device Information (0000180a-0000-1000-8000-00805f9b34fb) UUID: Battery Service (0000180f-0000-1000-8000-00805f9b34fb) UUID: Vendor specific (0000f00d-1212-efde-1523-785fef13d123)
This next part requires a “characteristc”. I’m going to demonstrate the 0000deef-1212-efde-1523-785fef13d123 characteristic, but the others I’ve looked at are listed at the bottom of this page. the deef characteristic is listed in the Humon Hex APK source code as HUMON_CALCULATED_DATA_CHARACTERISTIC.
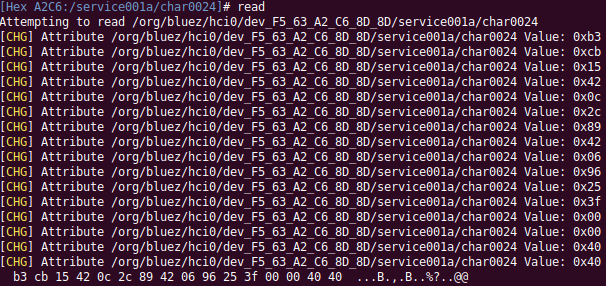
In the terminal : select-attribute /org/bluez/hci0/dev_F5_63_A2_C6_8D_8D/service001a/char0024 and then read. The result will look like this :
And yes, I gave some thought to whether or now I should leave the MAC addresses in… it’s a moxy sensor 😀
The resulting values count as 16 bytes in total, which seems like… a float maybe ? I couldn’t figure it out easily, so I grabbed a copy of the Humon Hex Android APK and decompiled it. It took a lot of digging as the app is a React Native application with most of the logic minified into a horrible blob of Javascript… BUT grep exists, so yay. After much grep’ping I came across this :
This told me what the characteristics on the device do. EVEN MOARRRRRR grep’ping later I found some of the code the app uses to reconstruct the data from the device. This is the cleaned up version :
groupNBytes = function(bytesArray, sizeOfGroup) { var n = Object.keys(bytesArray).map(function(sizeOfGroup) { return bytesArray[sizeOfGroup] }); return n.reduce(function(bytesArray, t, a) { return a % sizeOfGroup == 0 && bytesArray.push(n.slice(a, a + sizeOfGroup)), bytesArray }, []) }
byteArrayToFloat = function(r) { var e = r[3] << 24 | r[2] << 16 | r[1] << 8 | r[0], n = new ArrayBuffer(4); return new Int32Array(n)[0] = e, new Float32Array(n)[0] }
Take the values from the terminal, build an array with them and then curry them together to get something cool : [0] 37.44892501831055 [1] 68.58602905273438 [2] 0.6468204259872437 [3] 3
In this case [2] very closely matches the value my Wahoo ElMENT Bolt showed when I executed the read command in the terminal (multiplied by 100x).
You can stream these values by entering notify on once the attribute has been selected.
That’s about it for now, the next step is building a logger.
P.S. The battery level can be found on this characteristic : select-attribute /org/bluez/hci0/dev_F5_63_A2_C6_8D_8D/service000b/char000c 0002a19-0000-1000-8000-00805f9b34fb
Update: 12 February 2020 : Humon shuts down and leaves users stranded with old device firmware
Humon sent an email (quoted below), essentially saying they’ve shut down (not shutting down but rather shut down). With no advance notice they took all their public facing services down including the backing services for their web, Android and iOS apps. This also includes the resources used to do firmware updates.
Many Humon Hexes have subsequently hit the market and been snapped up (they’re awesome devices). Unfortunately many of these devices have old firmware on them. I recently received one such device and it *was* unusable without a firmware update.
Humon’s servers are down but fortunately their iOS app, which has also been removed from the App Store, caches firmware update files. As a result I now have a second Hex with updated firmware on it. This information has been relayed to another user who has successfully extracted the firmware update/DFU zip file from his iOS device.
The letter:
Dear Humon Athlete,

I’m reaching out with an important update about the future of Humon.

We started Humon in 2015 with the mission of empowering people with the body insights that they need to become their better selves. After years of research and development we released our first product, the Hex, in 2018. In the years that followed we were lucky to count amongst our customers some of the most talented athletes, professional teams, gyms, medical centers and academic researchers in the world. These people were able to leverage the Hex and Humon's software and algorithms to improve their performance, reduce injury and push the world of research forward. To this day we remain convinced that muscle oxygen is the best metric of exertion that exists.

That said, it is still a new and somewhat misunderstood metric that requires sustained levels of market education to exist. Sadly, Humon will no longer be able to further develop this technology and make muscle oxygen available and understandable to the world.

As of February 13th, 2020 we regrettably have no choice but to shut down most of the Humon service. Our iOS and Android mobile application will no longer be available for new downloads on the Apple App Store and Google Play Store, our cloud backend and web platform will be shut down, and our support channels closed. That said, you’ll still continue to be able to use your Hex with your Garmin data field that will remain available to download on the Connect IQ Store.

We understand that this comes as a major disappointment to those of you who do not use Garmin products but it is the necessary path forward today. It is also why we stopped selling the Hex in early January, as we began to realize that this would be the case.

This is not an uncommon story in the world of startups, but it is also how innovations can flourish and end up benefiting millions in the long run. On behalf of the Humon team we wanted to thank you all for you trust, support, and help in bringing this product to market. Together, we’ve written a chapter in the history of muscle oxygen.

Best,
Humon
Back in October 2012 I figured that at some point, in the then near future, that the Ratanga Junction theme park (located near Cape Town and built using funds from the global financial crisis of 2001) would probably be closed and demolished. The theme park had just lost two of its major attractions to land that had been carved out and handed off to office-block developers. It couldn’t be much longer I thought, so I decided to pay a visit to the wounded park and take a few photos for posterity.
In reality the bleeding theme park continued running for another six years and only now has proper disassembly of the park begun. I’ll eventually go back and try and recreate some of these images with whatever comes to replace Ratanga Junction, but for now here are a few titbits :
Welcome to Ratanga Junction – October 2012COME TO RATANGA JUNCT – December 2006 – thank you Arnold van der Walt
The Ratanga Junction sign boards/map boards summed up the state of Ratanga Junction at the time: sweating the asset. Monetary input was so tight the administrators didn’t have money to update the map boards by printing new boards when details changed, and more importantly, entire subsections of the park disappeared. Here the board is metal with a plastic/vinyl covering on which the salient information has been printed. The missing section of the map was physically cut out of the vinyl. Additional references to the ill-fated rides, in the bottom right corner, have been blacked out with insulation tape.
What happens when new things made-to-look old get old ? A Hippo from Hippo’s Hollow in surprisingly good condition for a 12-year old ornament.New old-things getting old…The Congo Queen ride.
Ratanga Junction was designed to be an immersive experience; entering the park was supposed to be like being whisked away to a foreign land. This approach relied on one suspending one’s sense of disbelief and to aid that the park prevented patrons seeing anything outside of the park’s boundaries…
A sign of things to come – a different view of the Congo Queen ride.
Of course, when the park’s limbs started getting chopped off, the illusion of a foreign land died very quickly – and ironically those visions were replaced with images of things to come.
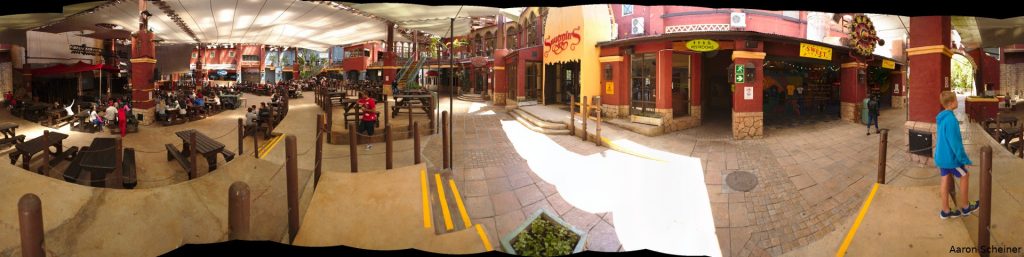
“Exciting hospitality offerings” are coming soon… (look how happy their mascots are)Remnants of an unknown ride and The Diamond Devil Run.Better times: part of the building in the lower-centre is present in my photo above on the right.Spooky Voodoo Bridge – leading to a newly-constructed car park.Spooky Voodoo Bridge back when it did go somewhere.Entrance to The Cobra roller coaster – renamed to “The Cape Cobras” in support of corporate sponsorship (from a company that no longer exists).The original, un-sponsored entrance (2006).The disused railway, now overgrown.Maggie’s Park (female primary mascot) looking over disused railway line and new car park.The Ratanga Junction ArenaA “lobby” area. 4×4 CRT public displays were obsolete, even in 2012.A “window” on the disused cinema building.Patrons enjoying Monkey Falls


.jpg)