This is a very wordy, rushed and technical post. I wrote most of this around 6 months ago and, in response to people asking about the contents of this post I have revisited it now before I forget everything. Some examples may not work, some Linux kernels give problems, it’s a minefield. That said, I achieved stable and reliable syncing between camera feeds being encoded by Raspberry Pis – with some caveats.
Some time ago I posted about the SlingStudio live streaming and switching system… that name just doesn’t stop delivering comedy 😬.
The SlingStudio system is amazing and great value for money, but it has specific and glaring drawbacks; namely that it is (practically) closed-source, only supports NTSC devices, uses heavily geo-restricted services and apps, to name just a few.
I investigated getting HDMI data into a Raspberry Pi. At the time I was after low-latency streaming and unfortunately this doesn’t seem to be possible with the Pi due to missing documentation for the hardware H.264 encoder… but! the latency is acceptable if you’re running the feed into OBS (Opensource Broadcast Studio) for the purposes of live streaming the programme output. (Update November 2020: It looks like the Pi’s encoder is not the reason for high latency, rather it appears that RTMP is the culprit; RTMP is not a low latency protocol, both muxers and demuxers do a lot of buffering. It looks like SRT would have been a better option).
This got me thinking: I could recreate the SlingStudio system using a couple of Raspberry Pis, coupled with HDMI->CSI interface modules, a hotspot and a decent laptop. This would make for a very cheap system, with the flexibility of OBS, any input format (PAL/NTSC) and the flexibility of open source equipment.
However, I discovered NDI and then kind of forgot about this research, so some of this was written several months after I experimented with this. Some of the examples here may not work or may require some experimentation.
So here goes…
I wasn’t able to get both video and audio encoding working on a Pi Zero. It simply doesn’t have the processing power to handle AAC encoding, but video works. More powerful Pis can do both.
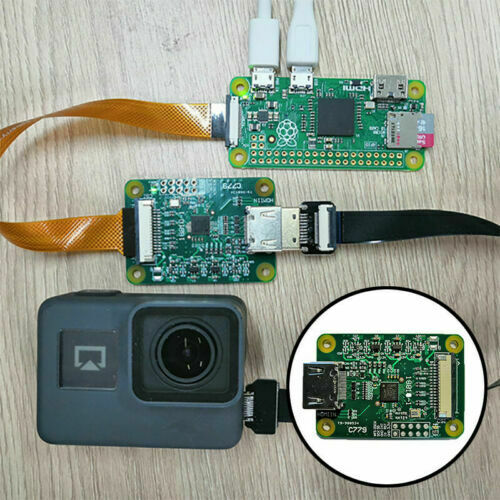
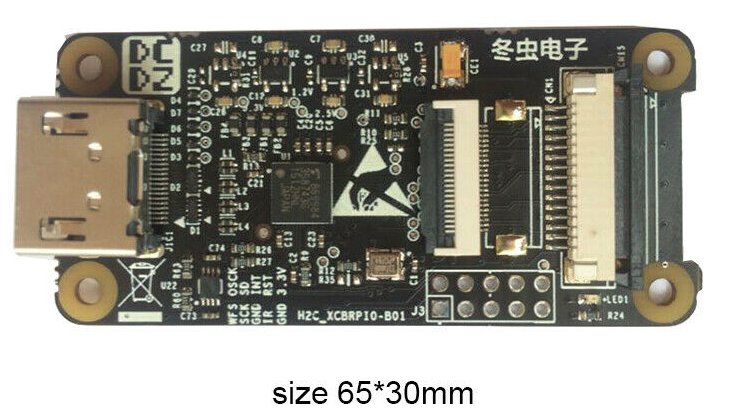
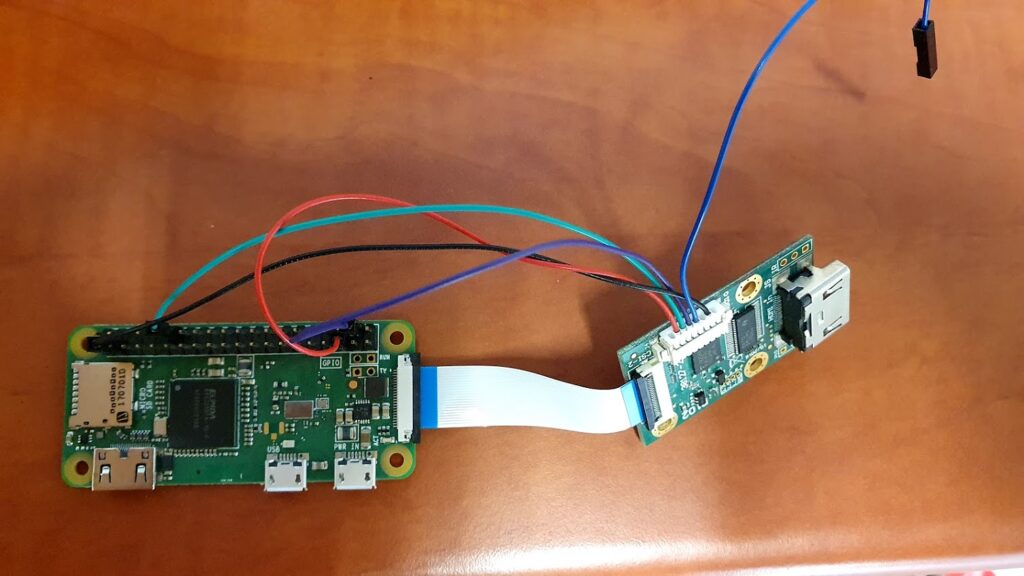
You wil need a suitable TC358743XBG-based interface module. These can be had on eBay for around $38. The underlying chip can be abbreviated to TC358743. They’re copies of the Auvidea B101 and B102 modules (69 Euros!), which were expensive and not that great. (Update November 2020: Unfortunately many cheap Chinese-originated boards on eBay/AliExpress have a broken PCB design of the audio circuit… if you want audio, you need to go for the B101… or just buy a BirdDog Encoder)
The guide below is not exhaustive, it’s just a packaged version of my bash history:
You will need to do the following things to prepare your clean Pi:

# If you want to speed things up (optional):
sudo mount -o remount,async,commit=500,discard,noatime,nodiratime /

# IGNORE THIS unless you want to use GStreamer instead of yavta/ffmpeg
# Install dependencies
sudo apt install build-essential git gstreamer1.0-plugins-good gstreamer1.0-plugins-rtp gstreamer1.0-plugins-ugly gstreamer1.0-plugins-base-apps  gstreamer1.0-plugins-ugly byobu htop gstreamer1.0-alsa ffmpeg

# Clone and compile yavta
git clone https://github.com/6by9/yavta
... etc. Should just be "make"

# Clone a repository containing an EDID file
git clone https://github.com/6by9/CSI2_device_config.git

# The following command has to be run each boot:
# Load in an EDID - this provides some resolution identities to the connected HDMI device - but cameras generally don't care about this and neither does your Pi.
#
v4l2-ctl --set-edid=file=/home/pi/CSI2_device_config/1080P50EDID.txt --fix-edid-checksums

# This command is purely informative:
# Connect your HDMI source
# and then query the timings
v4l2-ctl --query-dv-timings

# This command is probably unnecessary for YAVTA.
# Set the timings on the interface based on what's actually present
# This takes the detected stream and sets the interface resolution and framerate based on that query response. Downstream software like FFMpeg need this.
v4l2-ctl --set-dv-bt-timings query
Run sudo raspi-config and enable the Camera Interface.
The open your /boot/config.txt file, make sure the following lines are present:
# RPis that aren't the Zero or the first-gen:
dtoverlay=tc358743

# RPis that are the Zero or first-gen:
dtoverlay=tc358743,i2c_pins_28_29=1

# All Pis:
dtoverlay=tc358743-audio
gpu_mem=128
dtparam=i2c_arm=on
dtparam=i2s=on
dtparam=spi=on
dtparam=i2c_vc=on
dtparam=audio=on

# On the Auvidea module these are the pin mapping:
# pin 5 = SD  -> Pi GPIO20 PCM_DIN
# pin 6 = SCK -> Pi GPIO18 PCM_CLK
# pin 7 = WFS -> Pi GPIO19 PCM_FS
Run sudo sync, to synchronise your Pi’s filesystems and then sudo shutdown -r now to reboot.
Once you’ve rebooted you should be able to stream the HDMI data to a local RTMP server.
I use a handy NGinX docker image to create a sort-of RTMP “Hub”:
docker run -ti -p 1935:1935 --name nginx-rtmp --rm tiangolo/nginx-rtmp

# This runs the nginx-rtmp image interactively on host port 1935.
Stream video only using FFMpeg:
/home/pi/yavta/yavta -f UYVY --capture -n 3 --encode-to=- -m -T /dev/video0 | ffmpeg -use_wallclock_as_timestamps 1 -fflags +genpts -r 30 -framerate 30 -i - -c:v copy -f flv rtmp://10.0.0.x:1935/live/testy-use_wallclock_as_timestamps 1 is naturally only accurate if ntpd is running (or similar) so that the Pi’s clock is synced.
Note that “testy” is the stream key, and can be anything.
You can edit the yavta source to improve encoder efficiency and reduce latency. The most relevant sections are below:
diff --git a/yavta.c b/yavta.c
index 41e8832..09fb823 100644
--- a/yavta.c
+++ b/yavta.c
@@ -2070,7 +2070,7 @@ static int setup_mmal(struct device *dev, int nbufs, int do_encode, const char *
// Only supporting H264 at the moment
encoder_output->format->encoding = MMAL_ENCODING_H264;
- encoder_output->format->bitrate = 10000000;
+ encoder_output->format->bitrate = 5000000;
encoder_output->buffer_size = 256<<10;//encoder_output->buffer_size_recommended;
if (encoder_output->buffer_size < encoder_output->buffer_size_min)
@@ -2094,13 +2094,22 @@ static int setup_mmal(struct device *dev, int nbufs, int do_encode, const char *
print("Unable to set format on encoder output port\n");
}
+ {
+ MMAL_PARAMETER_UINT32_T param = {{ MMAL_PARAMETER_INTRAPERIOD, sizeof(param)}, 10};
+ status = mmal_port_parameter_set(encoder_output, ¶m.hdr);
+ if (status != MMAL_SUCCESS)
+ {
+ print("Unable to set intraperiod");
+ }
+ }
+
{
MMAL_PARAMETER_VIDEO_PROFILE_T param;
param.hdr.id = MMAL_PARAMETER_PROFILE;
param.hdr.size = sizeof(param);
param.profile[0].profile = MMAL_VIDEO_PROFILE_H264_HIGH;//state->profile;
- param.profile[0].level = MMAL_VIDEO_LEVEL_H264_4;
+ param.profile[0].level = MMAL_VIDEO_LEVEL_H264_42;
status = mmal_port_parameter_set(encoder_output, ¶m.hdr);
if (status != MMAL_SUCCESS)
MMAL_PARAMETER_INTRAPERIOD is the number of frames in a GOP (group of pictures). This is also called the keyframe interval. It represents a trade-off between latency and encoder efficiency.
MMAL_PARAMETER_PROFILE is the H.264 profile. The Pi only supports up to 4.2, as far as I know. 4.2 is more efficient for Full HD than 4.
encoder_output->format->bitrate = 5000000 – sets the bitrate.
You can now play back the stream by running:
vlc rtmp://IP_OF_NGINX_MACHINE:1935/live/testyThis can, of course, be used as a source in OBS. The trick now is to test many of these in paralell and see what happens.
Below is the timestamp offset calculation script for OBS (there’s some stuff at the bottom that may be required by OBS, I never bothered to figure out what was necessary and what wasn’t) (sources must have “xCam” in their name):
import obspython as obs
import time
import inspect
import json

source_name = ""

lastRun = 0

def cycle():
    global lastRun

    if not((time.time() - lastRun) > 5):
        return

    lastRun = time.time()
    Sources = []
    maxTime = 0

    sources = obs.obs_enum_sources()
    if sources is not None:
        for idx, source in enumerate(sources):
            name = obs.obs_source_get_name(source)
            if "xCam" in name:
                src = dict()
                src["name"] = name
                src["time"] = obs.obs_source_media_get_time(source)
                Sources.append(src)

    obs.source_list_release(sources)

    for idx, src in enumerate(Sources):
        if src["time"] > maxTime:
            maxTime = src["time"]

    for idx, src in enumerate(Sources):
        src["delay"] = 1000 + (maxTime - src["time"])

    print(json.dumps(Sources))

def refresh_pressed(props, prop):
    """
    Called when the 'refresh' button defined below is pressed
    """
    print("Refresh Pressed")
    update_text()


def update_text():
    global source_name

    source = obs.obs_get_source_by_name(source_name)
    text = "Hello World"
    if source is not None:
        settings = obs.obs_data_create()
        obs.obs_data_set_string(settings, "text", text)
        obs.obs_source_update(source, settings)
        obs.obs_data_release(settings)
        obs.obs_source_release(source)

# ------------------------------------------------------------


def script_properties():
    """
    Called to define user properties associated with the script. These
    properties are used to define how to show settings properties to a user.
    """
    props = obs.obs_properties_create()
    p = obs.obs_properties_add_list(props, "source", "Text Source",
                                    obs.OBS_COMBO_TYPE_EDITABLE,
                                    obs.OBS_COMBO_FORMAT_STRING)
    sources = obs.obs_enum_sources()
    if sources is not None:
        for source in sources:
            source_id = obs.obs_source_get_id(source)
            if source_id == "text_gdiplus" or source_id == "text_ft2_source":
                name = obs.obs_source_get_name(source)
                obs.obs_property_list_add_string(p, name, name)

        obs.source_list_release(sources)

    obs.obs_properties_add_button(props, "button", "Refresh", refresh_pressed)
    return props


def script_update(settings):
    """
    Called when the script’s settings (if any) have been changed by the user.
    """
    global source_name

    source_name = obs.obs_data_get_string(settings, "source")
    obs.timer_add(cycle, 2000)
Some extra notes (stuff that may be useful):
GStreamer can also be used, the line below does video and audio, but doesn’t timestamp the data with the system clock time:
gst-launch-1.0 flvmux streamable=true name=mux ! rtmpsink location="rtmp://IP_OF_NGINX_MACHINE:1935/live/bleh" v4l2src ! "video/x-raw,framerate=60/1,format=UYVY" ! identity sync=true ! v4l2h264enc extra-controls="controls,h264_profile=4,h264_level=10,video_bitrate=256000;" ! video/x-h264,profile=high ! h264parse ! queue ! mux. alsasrc device=hw:1 ! audio/x-raw,rate=48000,channels=2 ! identity sync=true ! audioconvert ! voaacenc bitrate=16000 ! aacparse ! queue ! mux.
Timestamping Video Data using ffmpeg:
/home/pi/yavta/yavta -f UYVY --capture -n 3 --encode-to=- -m -T /dev/video0 | ffmpeg -fflags +genpts -use_wallclock_as_timestamps 1 -r 30 -framerate 30 -i - -vcodec copy -use_wallclock_as_timestamps 1 -copyts -f flv rtmp://x.x.x.x:1935/live/testySome v4l2 and ALSA stuff:
# Load an EDID file (to report timings to the sending device)
v4l2-ctl --set-edid=file=/home/pi/1080P30.txt --fix-edid-checksums

# Set resolution and framerate based on current signal timings
v4l2-ctl --set-dv-bt-timings query

# Show the current timings of the input signal
v4l2-ctl --query-dv-timings

# Record some audio from an alsa device (useful for testing)
arecord -f S16_LE -d 10 -r 48000 --device="hw:0,0" /tmp/test-mic.wav